This is a guest post by Sam Raby. A freelance mapmaker, Sam created Placing Oral Histories under contract with the Esri Story Maps team.
My first attempt at creating an “oral history map” was with a project I worked on documenting my family’s escape from Iraq. My whole life, I had heard bits and pieces of their story of displacement but never had a chance to record it, and in 2015, I finally got an opportunity to create a permanent archive of it as part of an independent school project.
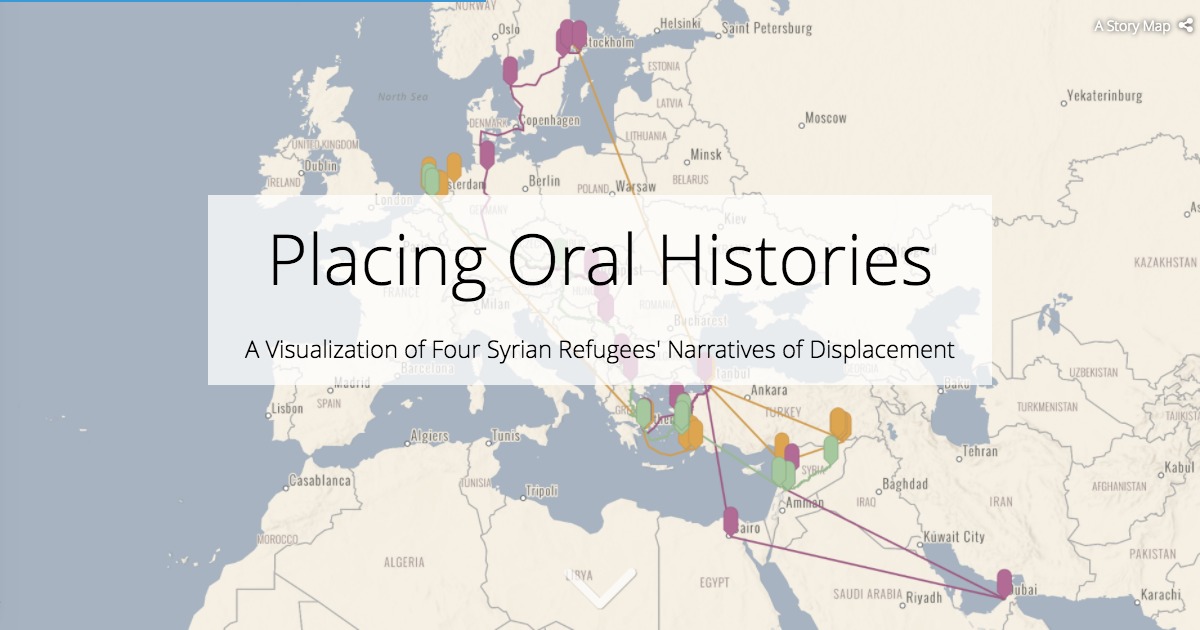
Given my obsession with geography, I wanted to preserve not only the oral histories of my family’s escape, but also the places and spaces that marked their journey to the US. I came to a realization through developing the project that mapping these stories brought out a crucial component that would have been lost in words alone — it carried my family’s story out of the ambiguously defined image of the “Middle East” and into the real world. Placing Oral Histories, a project I developed in conjunction with Esri Story Maps, is essentially a recreation of the project I did with my own family’s story. It is a further exploration of how we can use maps to humanize refugee oral histories.
This post will walk through the methods I used in creating “Placing Oral Histories.” No previous experience with GIS software and/or ArcGIS Online is required. Keep in mind that there are infinitely many ways to capture geography when telling someone’s story, so I encourage you to use this method as a starting point for developing your own ideas with oral history mapping.
1. Recording the Oral History First
My process developing “Placing Oral Histories” started with in-person interviews I conducted with Syrian refugees living in the European diaspora. As preserving the oral part of these oral histories was important to the project, I used audio recording software on my personal computer to record my verbal interviews, and I later transcribed them. I specifically used QuickTime Player to record the audio, an app that is standard on all recent Mac OS X operating systems, but any type of audio recording software or device would have worked just as well.
I experimented with two different interview methods during this process, and one very clearly worked better than the other:
- The less effective method: Gathering a list of geographic locations during/as part of the interview. I tried this method first, and I found that it interfered with the interviewee’s focus on their own story (and also made transcribing much more tedious).
- The more effective method: Story first. Geography second. Let your interviewee tell the story the way that they remember it and the way that they choose to tell it. This seems to fit best with proper oral history practice, and also naturally gives a roadmap for the geographic component by filtering what places are important to the storyteller and what are appropriate to leave out.
2. Collecting the Geographic “data”
After I recorded the verbal part of each interviewee’s oral history, I began the process of placing the story on a map. I found it crucial to begin this next step immediately after the interview, so the interviewee’s story was fresh in their mind. Here is the process I used:
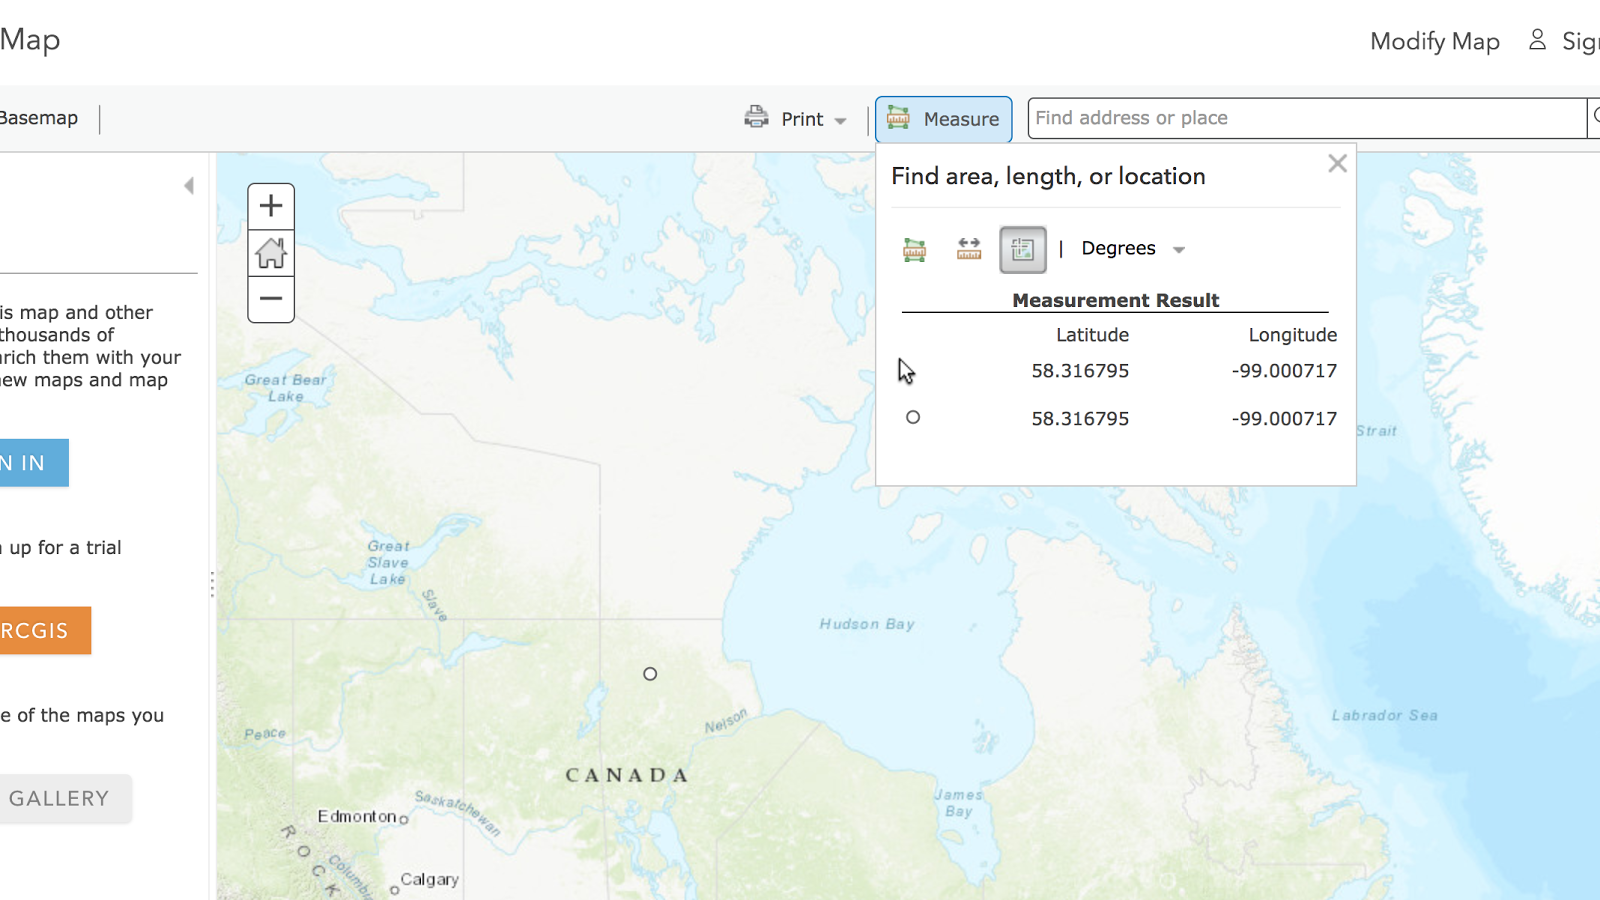
On a computer, open up a blank web map in ArcGIS Online in one window and a spreadsheet (I used Excel) in another window. On the webmap, have your interviewee locate points on the map that corresponded to segments of their oral history. The easiest way to do this is by clicking on the “Measure” tool on the top of the page, clicking on the third icon from the drop-down menu, and then clicking points on the map. This tool will generate the lat/long coordinate for each point your interviewee finds. Each point the interviewee selects on the map, copy the lat/long in the Excel document.
Other common mapping tools like Google Maps can get you these coordinates as well, so feel free to use whichever is most comfortable.
3. Formatting the Excel Document
For your project, once you collect the lat/long coordinates for whatever story you are working on, make sure to separate the coordinates into two different columns in Excel, one called “Latitude” and one called “Longitude”. I included a “Name” column and added in a name for each point (e.g., “Damascus, Syria”). You can feel free to add and fill in any extra columns you see fit. Make sure that whatever you plan to include as a part of the spatial data, you add to the spreadsheet during this step. It it much more difficult to add things in later on.
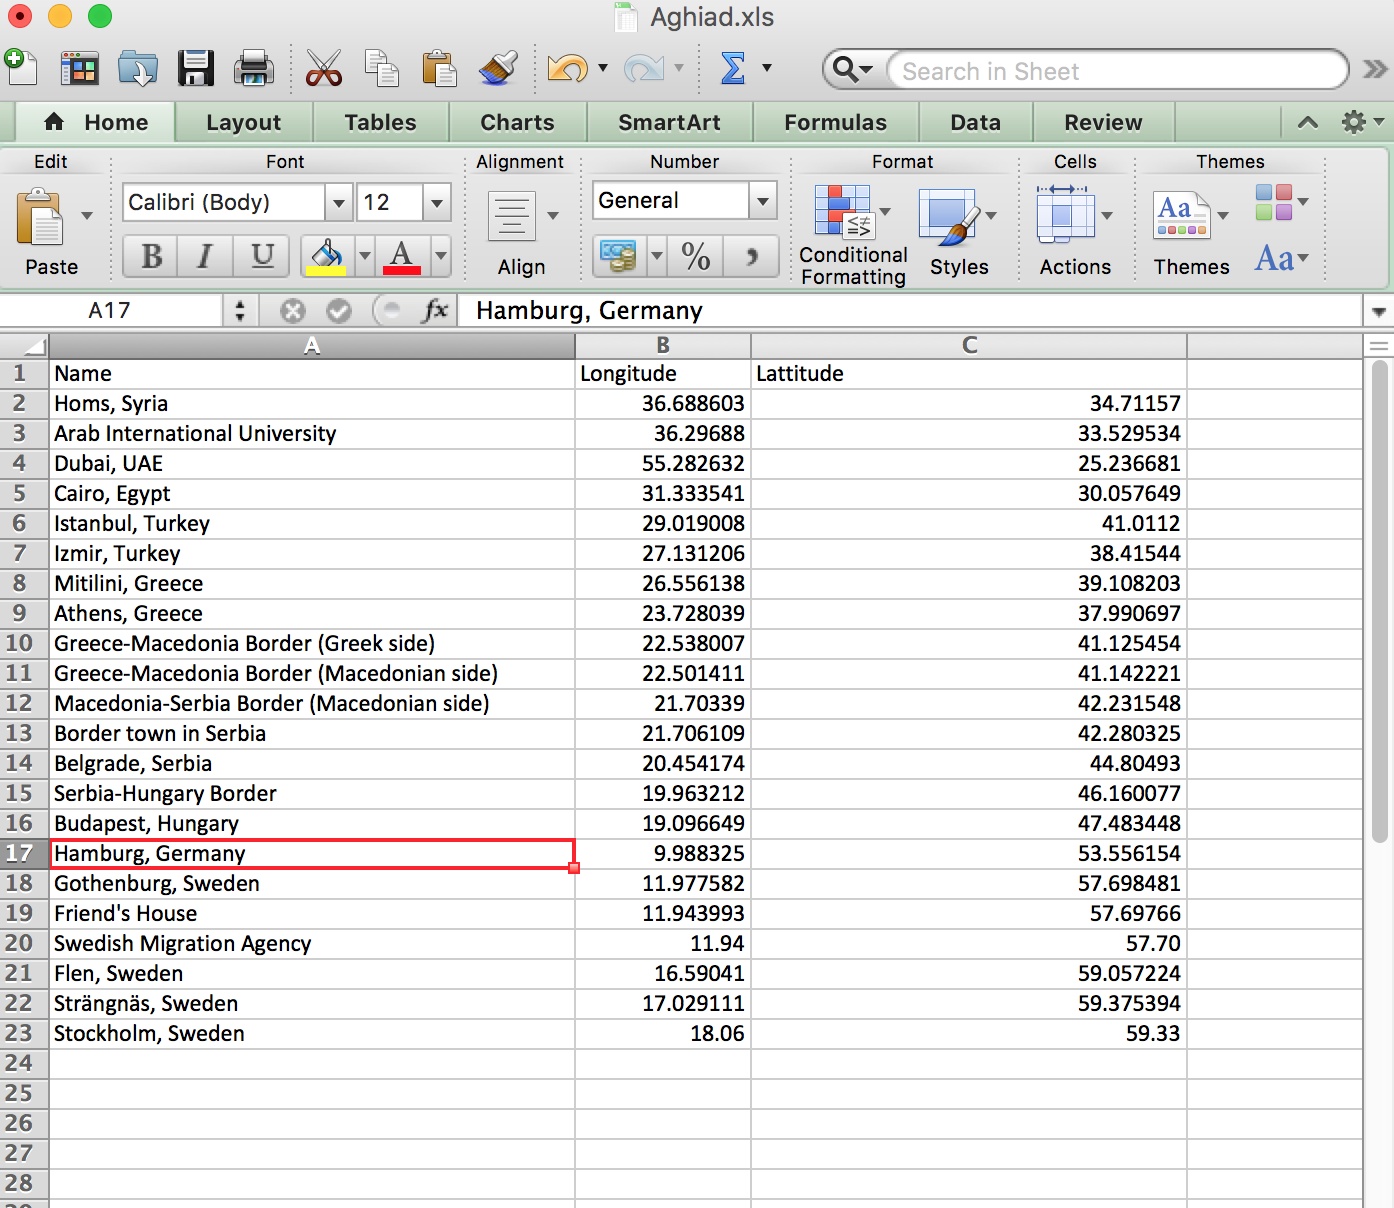
After formatting the Excel sheet, save the spreadsheet as a .csv file on your local computer.
4. Adding the data to ArcGIS Online
To get these points online, log in to your ArcGIS Online account (if you don’t have one, you can sign up for a free basic account here), and create a new blank web map. Click on “Add” in the upper left corner, then “Add Layer from File.” In the new pop-up window, click on “Choose File,” select the .csv file of locations you want to visualize, and click “Import Layer.”
Now, you need to specify which fields in your spreadsheet are the lat/long coordinates. In the new window, make sure the “Locate features by” prompt is set to “Coordinates.” Below it, you will see a list of all the columns from your spreadsheet. Click the text that is directly to the right of “Latitude” (or whatever you named the latitude column), and you should see a dropdown list. Select “Latitude.” Do the same for “Longitude.” Click “Add Layer.”
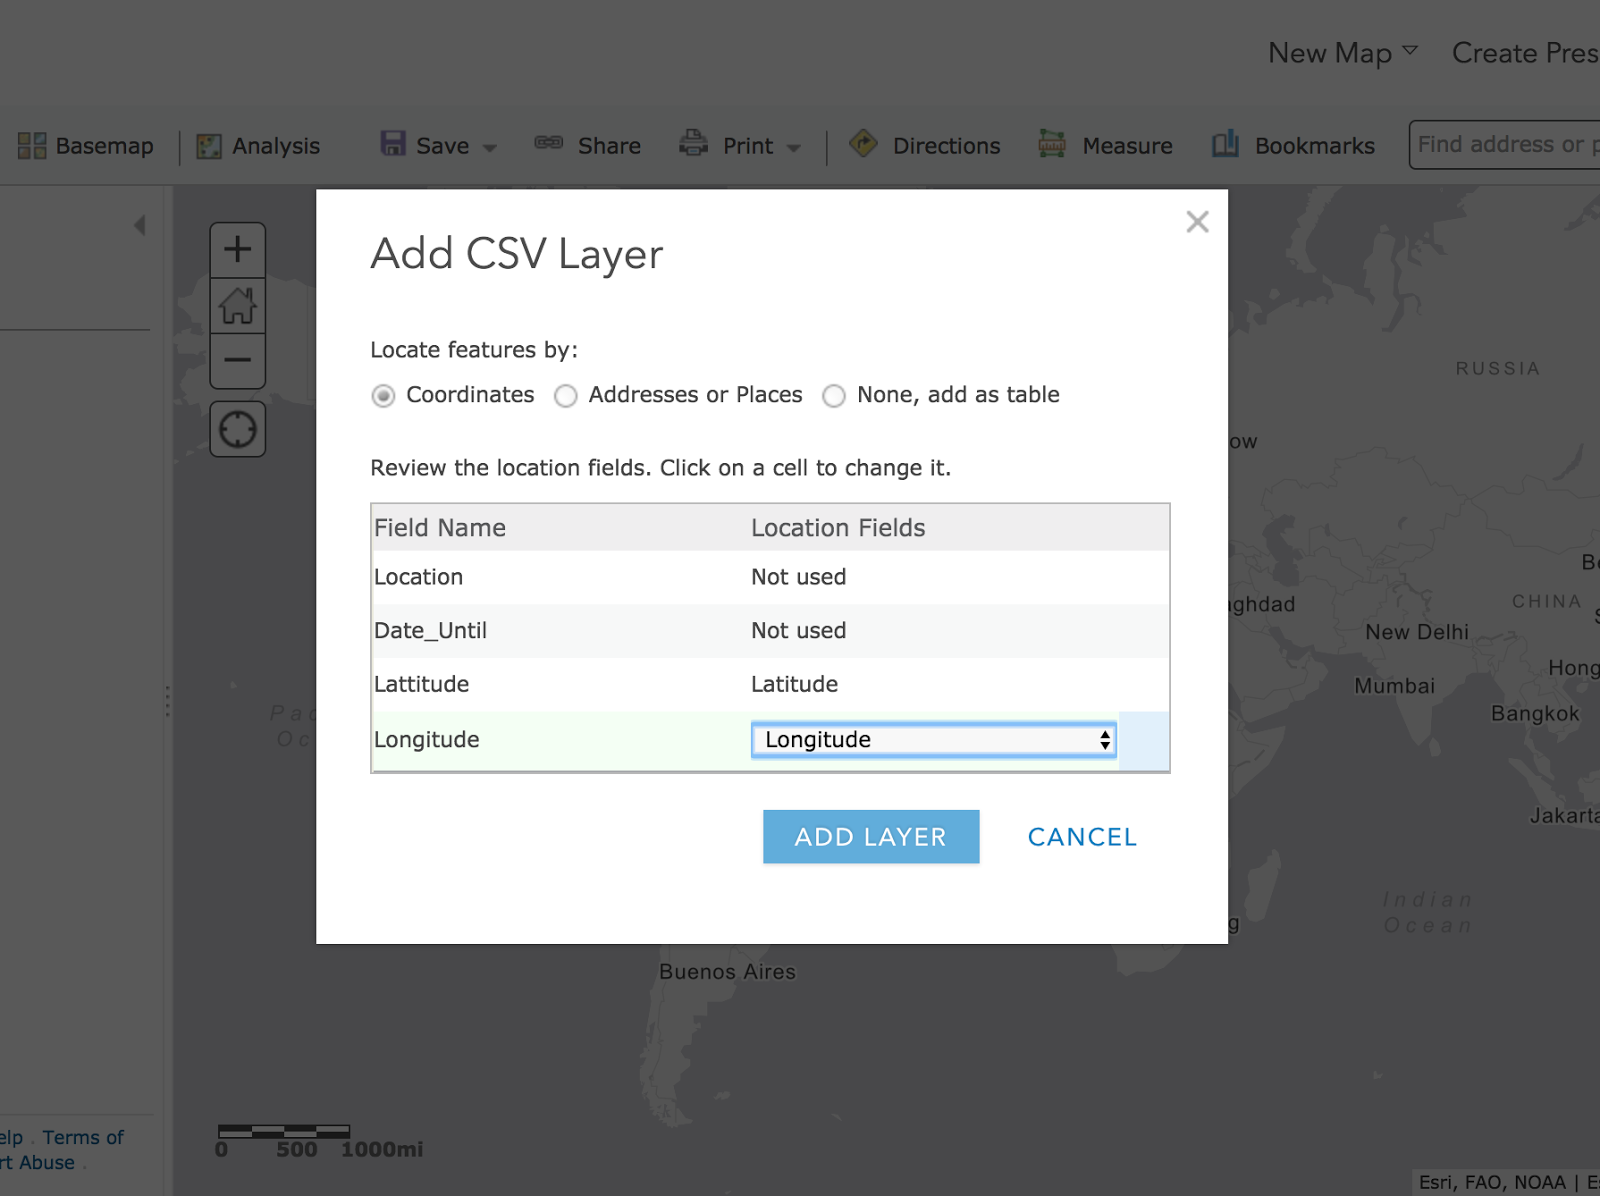
And there you go! You should see dots on the map pop up, corresponding exactly to the points your interviewee located during your interview process. If the points look all over the place, it is likely that you mixed up lattitude and longitude when making your spreadsheet (this happened to me twice during my project). Simply repeat the steps above except switch “Latitude” and “Longitude” when designating the location columns in the CSV import dialogue.
Feel free to symbolize your points and add pop-ups as you like. You can always come back and change that later on. Once the points look as you want them, make sure to save your web map, using the button in the upper-right corner, before you quit.
5. Building Something Cool
At this point, you now have a fully interactive spatial dataset as part of your interviewee’s very own oral history. There are many things you can now do…
- Export some maps for print/static viewing. This method is great if you hope to include these maps in print. There are two easy ways to do this: when viewing your web map, click on the Print icon. This will allow you to print (or save to your desktop) a view of your map. Or, simply take a screenshot of your webmap. This method is even easier, and if you have a high-resolution display, you may get a better quality image.
- Build a Story Map. Story Maps are a perfect way to blend together text, photos, maps, and even audio to create an archive of one’s oral history. Placing Oral Histories used the Story Maps Cascade Template, but the Story Maps Journal template also works very well with these kinds of projects. Check out this tutorial to get started.
Further questions on oral history mapping? Contact Sam Raby or the Story Maps team.

Commenting is not enabled for this article.