At times it can be beneficial to separate the ArcGIS Pro SDK customizations you’ve developed into more than one Pro add-in. For example, you may want to enhance the capabilities of an existing add-in, or perhaps incrementally release functionality across a set of add-ins.
In this post, we’ll look at how to combine the UI aspects of your add-ins. We’ll create a simple button on a custom tab on the Pro ribbon, established by a “basic” or “core” add-in, and then add a new button to it from a second add-in using a dependency. This concept is covered in the ProConcept Advanced Topics document, which contains important loading scheme information for both add-ins and configurations.
Step 1: We build an add-in called LoadFirstAddin and create a button with the caption “Add-in 1 Button”, which is placed on a new, custom tab with the caption “Loading Test”. Note the id’s for AddInInfo, insert module and the control group:
<ArcGIS defaultAssembly="LoadFirstAddIn.dll" defaultNamespace="LoadFirstAddIn" ...
  <AddInInfo id="{8e02feab-39eb-48ff-918e-f4c22f451d1c}" version="1.0" desktopVersion="2.0.8933">
    <Name>LoadFirstAddIn</Name>
  ...
  </AddInInfo>
  <modules>
    <insertModule id="LoadFirstAddIn_Module" className="Module1" autoLoad="false" caption="Module1">
      <tabs>
        <tab id="LoadFirstAddIn_Tab1" caption="Loading Test">
          <group refID="LoadFirstAddIn_Group1"/>
        </tab>
      </tabs>
      <groups>
        <group id="LoadFirstAddIn_Group1" caption="Add-in 1 Group" appearsOnAddInTab="false">
          <button refID="LoadFirstAddIn_Button1" size="large" />
        </group>
      </groups>
      <controls>
        <button id="LoadFirstAddIn_Button1" caption="Add-in 1 Button" className="Button1"
         loadOnClick="true" smallImage="ImagesGenericButtonBlue16.png" largeImage="ImagesGenericButtonBlue32.png">
          <tooltip heading="Tooltip Heading">Tooltip text<disabledText /></tooltip>
        </button>
      </controls>
    </insertModule>
  </modules>
</ArcGIS>
Step 2: We build a second add-in called LoadSecondAddin which sets a dependency on LoadFirstAddin by referencing its AddInInfo GUID value in a DAML dependencies section — note the GUID value of the DAML dependency element’s name attribute. By declaring a dependencies section in our LoadSecondAddin’s DAML, we are letting the Pro framework know that our (LoadSecondAddin) add-in depends on the DAML of another add-in (LoadFirstAddin). If your add-in depends on two or more add-ins (e.g., your button is inserted onto multiple tabs) then the dependencies section should contain a dependency element for each dependency add-in. In this case, we reference a dependency just for LoadFirstAddin:
  </AddInInfo>
  <dependencies>
    <dependency name="{8e02feab-39eb-48ff-918e-f4c22f451d1c}" />
  </dependencies>
Step 3: We create a button in LoadSecondAddin with the caption “Add-in 2 Button” which we place in the LoadFirstAddin’s “Add-in 1 Group” using an updateModule section, referencing the module id and group id from LoadFirstAddin and use insertButton to reference the addition of our new button. Here’s the DAML code:
<modules>
<insertModule id="LoadSecondAddin_Module" className="Module1" autoLoad="false" caption="Module1">
<controls>
<button id="LoadSecondAddin_Button2" caption="Add-in 2 Button" className="Button2"
loadOnClick="true" smallImage="ImagesGenericButtonBlue16.png"
largeImage="ImagesGenericButtonBlue32.png">
<tooltip heading="Tooltip Heading">Tooltip text<disabledText /></tooltip>
</button>
</controls>
</insertModule>
<updateModule refID="LoadFirstAddIn_Module">
<groups>
<updateGroup refID="LoadFirstAddIn_Group1">
<insertButton refID="LoadSecondAddin_Button2"></insertButton>
</updateGroup>
</groups>
</updateModule>
</modules>
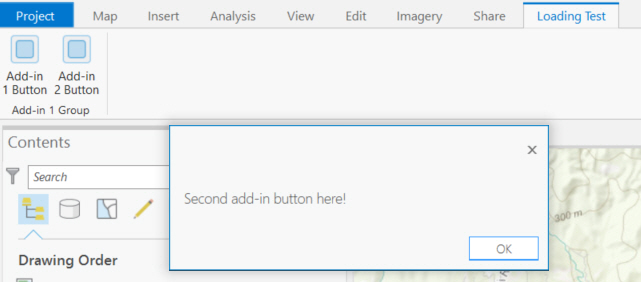
</ArcGIS>Step 4: We build and run Pro, and click on the “Loading Test” tab defined by LoadFirstAddin. We see that the button from LoadSecondAddin has updated the “Add-in 1 Group” and has been inserted next to the “Add-in 1 Button”. With a click, we can see LoadSecondAddin’s button is working:
For essential information on working with DAML in the Pro SDK, see the ProConcepts Framework document.


Article Discussion: