With the June 2017 ArcGIS Online release, tile layers have evolved; When publishing hosted tile layers from hosted feature layers, you can create tiles automatically. Choosing automatic means you don’t have to worry about building your tile cache ahead of time. Tiles are generated on demand when someone views that area and scale. Once created, the tiles are cached and available for all subsequent views. Demand dictates where tiles are created, rather than having to build tiles for the entire extent of the layer, which may never be viewed at all scales. Additionally, when the data in the feature layer changes tiles are automatically updated. This includes when a feature is added, removed, or modified. Tiles for that area will be updated automatically to reflect the new data within a few minutes. With automatic tiles, you don’t have to worry about building your tile cache ahead of time or updating tiles to keep them updated with the latest feature data.
As part of the rollout for this new capability, tile generation costs have been reduced by a factor of ten. Tile generation previously cost one credit for every 1,000 tiles generated. Tile generation now costs one credit for every 10,000 tiles generated. Storage costs remain the same at 1.2 credits per 1 GB stored per month. Tile generation costs are charged to the owner of the tile layer.
Tiles from features
Tile layers published from feature layers are ideal for large datasets where the feature data changes, such as parcel data where boundaries and attribute data may change regularly, or if you don’t want to worry about managing the tile cache. When publishing your feature layer as tiles, pop-ups are automatically enabled on the tile layer with the pop-up configuration of the feature layer. In the map viewer and other applicable browser-based apps, analysis and other query-based functionality such as tabular views of the feature data are available for tile layers created from feature layers as well.
When a tile layer is published from a feature layer, features are rendered by the service powering the tile layer and delivered to you as images, also known as raster tiles. By taking this approach the service avoids sending potentially large and complex features and data to your device and forcing your browser or app to do all the heavy lifting to display that information on a map. Because only tiles are sent and rendered, you get much better performance, especially on browsers, for large data such as county wide parcel data. Previously, there were a few considerations that must be evaluated when using tile layers. The tile cache must be built ahead of time. If data changed, the tile layer must be updated as part of a separate process. These considerations effectively limited the role tiles play in visualizing data, especially larger feature layers where data is updated regularly. With tiles created automatically, these limitations are no longer applicable.
How to create an automatic tile layer
- Configure your hosted feature layer as you want your tiles to be displayed, such as the style used to symbolize the layer as well as the scale range. It’s important to configure your feature layer prior to publishing the tile layer. Once the tile layer has been published, the tiles will use the symbology as configured on the feature layer when the tile layer was published. Similarly, the scale range on the feature layer dictates the maximum scale range available for the tile layer.
- After you’ve configured your hosted feature layer, publish your hosted tile layer by going to the details page for the hosted feature layer and clicking Publish. On the dropdown, select ‘Tiles’ to begin the publish process. The option to create tiles automatically is selected by default, displayed at the bottom of the Publish dialog.

You can also adjust the visible range on the Publish dialog. By default a suggested visible range is set based on your data but can be modified as needed. The suggested visible range is based off a sampling of the data in the feature layer. The visible range determines the scale range where tiles can be generated; Tiles are not generated outside of the scale range you specify.
Note: tiles may take longer to generate at smaller scales. It is dependent on the complexity of your data. The more complex the features, the longer it may take to generate tiles at smaller scales. At scales where tile generation is taking longer than expected, you can choose to build tiles for that scale ahead of time. If the suggested visible range is modified to include additional smaller scales, tiles for these scales are pre-created immediately after publishing.
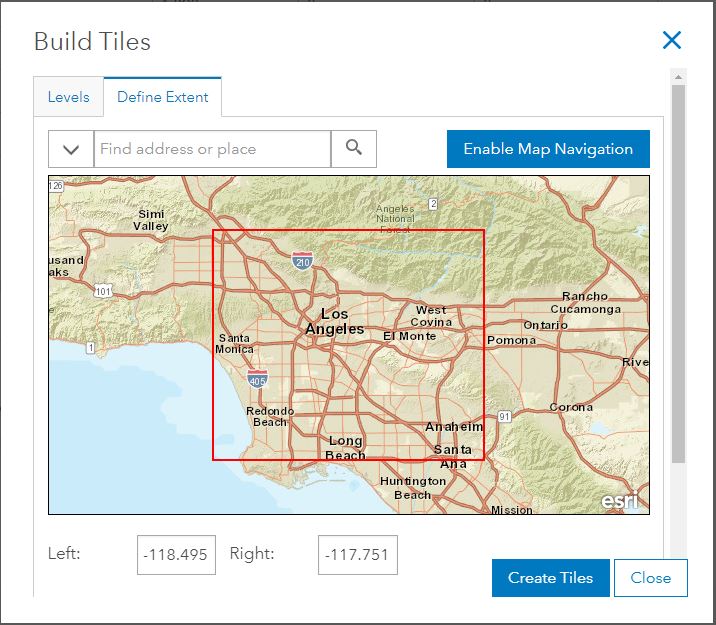
- Share and use the layer! Once published, the layer is ready to use. No further action necessary other than sharing it with the appropriate audience. Tiles will be generated as they are initially requested and cached for subsequent views.While tiles are generated on demand, you still have the option to manage the tile cache manually. You can build tiles for a particular scale, or level. You can also build tiles by extent. If you expect heavy usage for specific areas, you can create tiles ahead of time for those areas. When selecting an extent, you must also select at least one level. Tiles will then be created at the defined extent for the selected levels of detail.
Considerations
There are a few considerations when configuring your tile layer:
- Most styles are supported but a few are not. See Styling Considerations for more details.
- Labels are not supported in tiles created automatically.
- Tile layers created from feature layers prior to June 26,2017 cannot be switched to automatic.
More Info
- See Paul’s post about choosing the best layer for common workflows.
- Get more information about publishing tiles from features.
- See what else is new in the June 2017 release.
Stay tuned for more posts about hosted tile layers and managing your hosted data!

Commenting is not enabled for this article.