Note: This blog article covers the classic Esri Story Maps which are in mature support and scheduled to be retired in late 2025. Story authors are strongly encouraged to use the new ArcGIS StoryMaps to create stories.
For more information about transitioning to the new StoryMaps, see ArcGIS StoryMaps resources. For more information about the transition from classic Esri Story Maps to the new ArcGIS StoryMaps, see Esri Story Maps: Now in mature support.

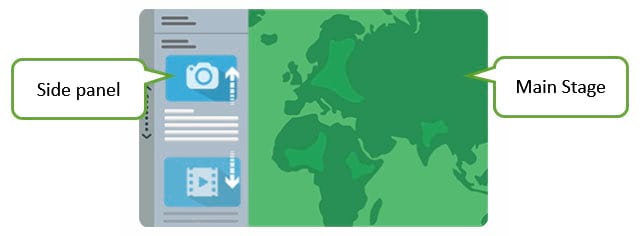
A Story Map Journal is an ideal choice when you want to combine narrative text with maps, media, and other embedded content to tell a story. A Map Journal contains entries, or sections, that viewers scroll through. Each section is composed of a main stage and an accompanying side panel.
Maps or other featured media are placed on the main stage, with side panel content complementing what is presented there.
Story actions can be configured via the side panel to interact with the main stage. Story actions can interact with a map on the main stage to zoom, toggle a layer, display a pop-up, or any combination of these. Actions can also display a new map, image, video, web page, or even open another application (or Story Map). And actions can also be used to create links to sections
Using story actions for interacting with the map
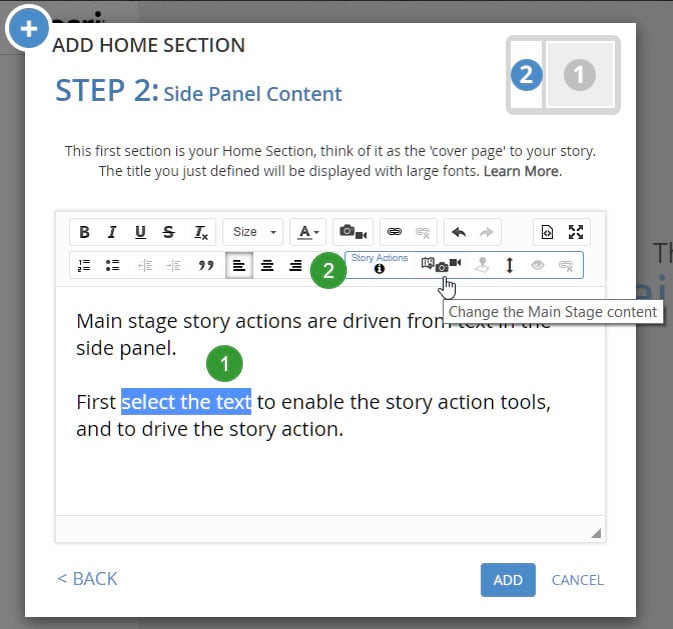
After you’ve added a map to the main stage (see the Story Map Journal Tutorial), you can add story actions to the side panel that interact with the map. Story actions are driven from text links in the side panel. Links can be applied to any text in the side panel, including captions under images.
For actions that interact with the current main stage map, first (1) select the text you want to use (this enables the main stage action button), then (2) click to Change the story action tool to Change the Main Stage content.
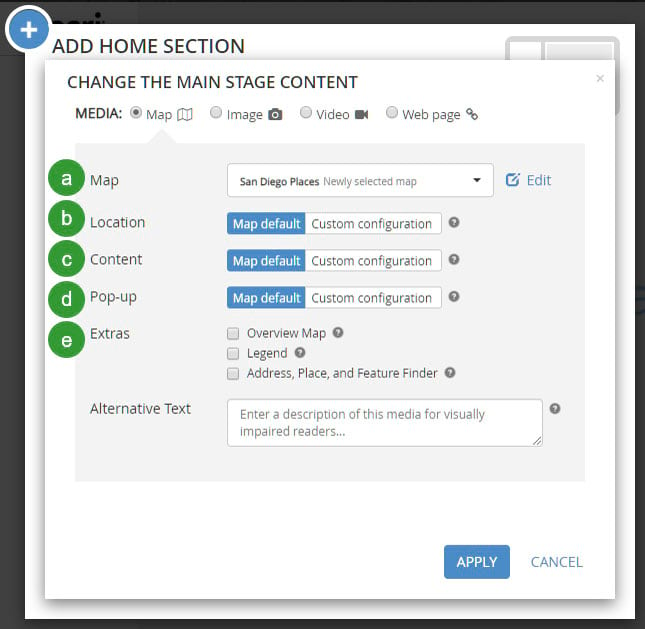
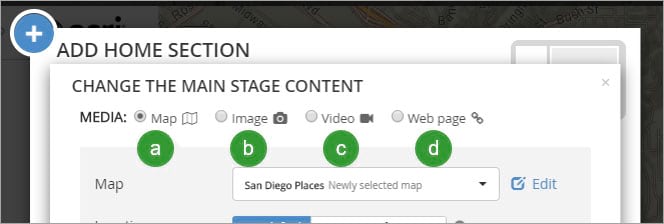
In Change The Main Stage Content, you can
a – Change the the map. This is the default.
b – Set the map location.
c– cToggle the map content.
d – Open a pop-up.
e – Manage map extras, like an overview map, legend, and finder.
Story actions can be used individually, or combined. For example, you can configure a story action that zooms to a specific location in the current map. Or you can configure a story action that zooms to a specific location in the current map, and also opens a pop-up window.
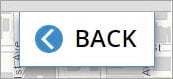
When the story action link is clicked, the action is performed and a back button appears at the top of the map, which returns the main stage to its previous settings.
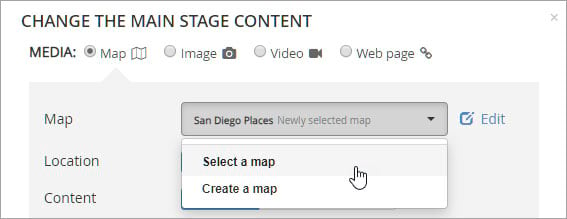
Change the map
To change the map, click the drop down and choose Select a map, or Create a map. The new map will replace the one on the Main Stage when the story action is clicked.
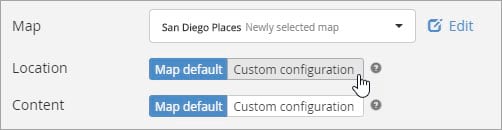
Change the map location
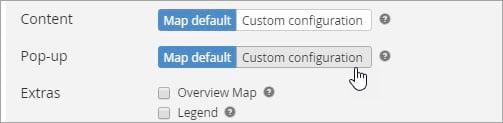
To change the map location, in the Location section click Custom Configuration.
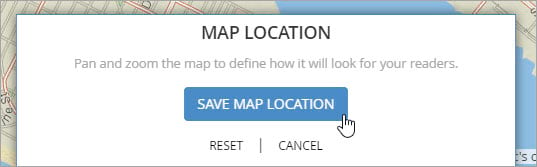
The map will appear, and you can pan, zoom, or enter an address to position the map. When finished, click Save Map Location.
Change layer visibility
To change layer visibility, in the Content section click Custom configuration.
Check the boxes on or off for the layers that you want to display, then click Save Map Content.
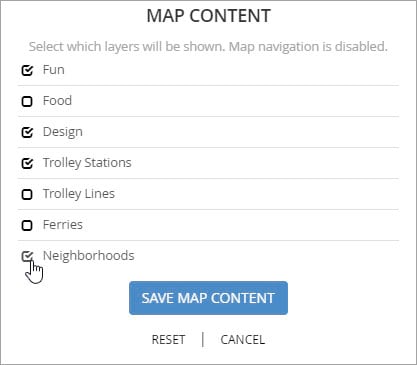
When the story action link is clicked, the layer visibility will change as you’ve toggled. The Back button appears at the top of the map; click to return the map to the previous settings.
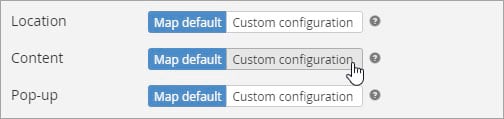
Open a pop-up
To open a feature pop-up in the map, in the Popup section click Custom configuration.
Click a feature to open its pop-up. With the pop-up open, click Save The Pop-Up Configuration.
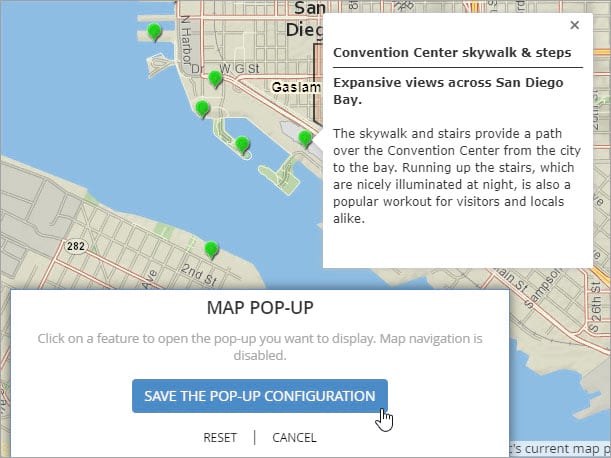
When the story action link is clicked, the pop-up will open. The Back button appears at the top of the map, which closes the pop-up and returns the map to the previous settings.
Using story actions for switching main stage content
You can also use story actions to change the main stage content entirely. For example, you can switch from the current map to display a new map, or a video, image or web page. Or you can switch from an image to display a new image, or a map, video, or web page. In each case, a Back button will appear after the action that will return the main stage back to its previous settings.
For all actions that change what is shown on the main stage, (1) Select the text you want to use (this enables the main stage action button), then (2) click to Change the Main Stage content.
In Change The Main Stage Content, you can switch to a different (a) map, (b) image, (c) video, or (d) web page. Map is the default, and the various options are covered above.
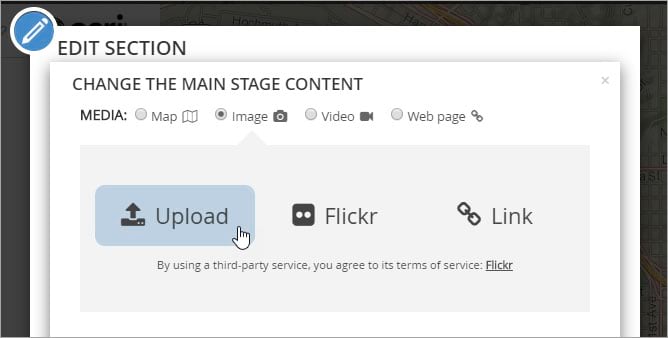
Display an image
Click Image to show the options for selecting an image by uploading a local file, or from Flickr, or a URL. Local files are recommend as these will be automatically optimized for the web, and will be included within the Map Journal. Adding images from Flickr will require entering a username.
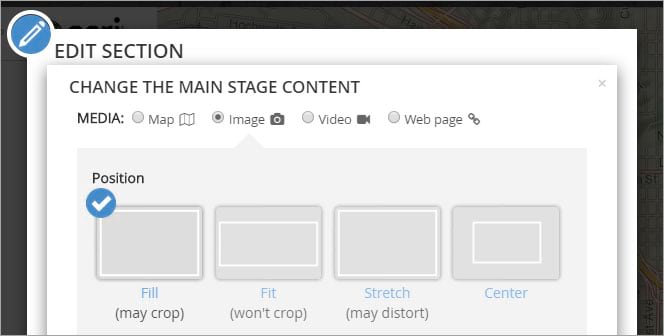
After selecting the image, choose the Position for the image. The default is Fill, but test other options to ensure best results.
When the story action link is clicked, the specified image will open. A Back button appears at the top of the image, which returns the main stage to the previous settings.
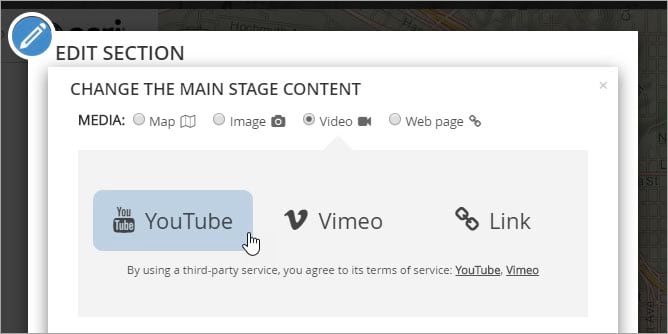
Display a video
Click Video to show the options for selecting a video from YouTube, Vimeo, or a link to a video source.
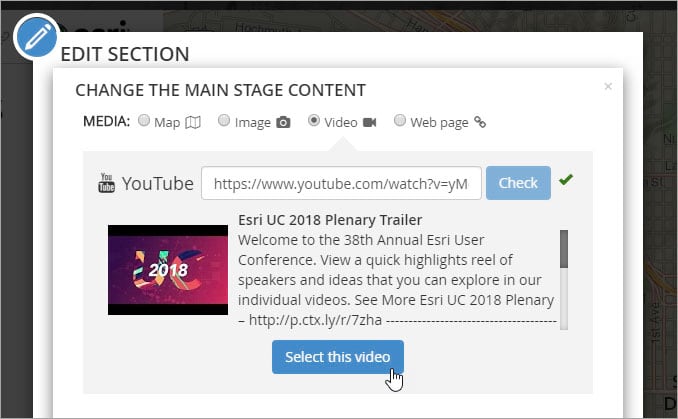
When adding a video from YouTube or Vimeo, after copying and pasting the URL click Check to ensure the URL is correct, then click Select this video to add it to your story map.
After selecting the video, choose the Position for the video. The default is Fill, but test other options to ensure best results.
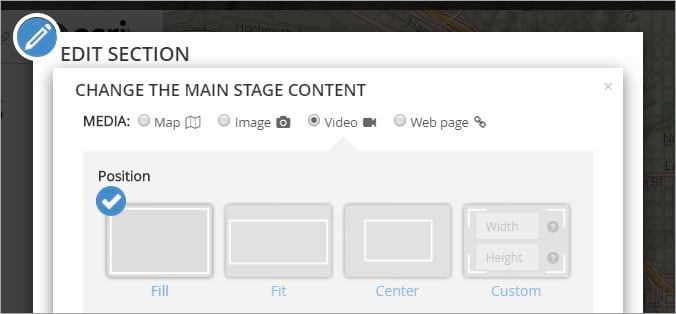
When the story action link is clicked, the specified video will open. A Back button appears at the top of the map, which returns the main stage to the previous settings.
Display a web page
Click Web page to show the options for adding a Web page to the main stage. Copy and paste the web page URL (shown with the arrow), then click Configure. Optionally you can add the embed code for the page.

Next, choose the Position for the Web page. For most web pages, especially responsive pages, Fill is the best option. Test to ensure the Position option you’ve chosen is the best choice.
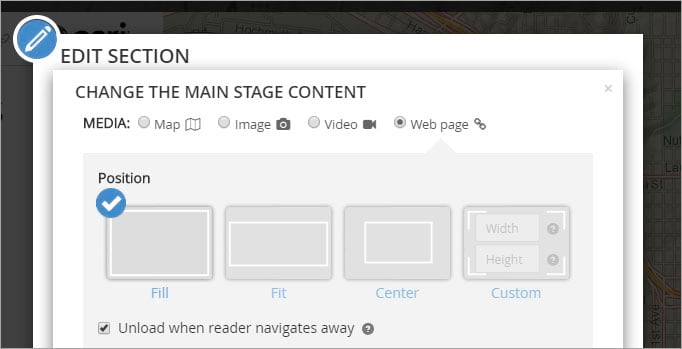
When the story action link is clicked, the specified web page will open. A Back button appears at the top of the map, which returns the main stage to the previous settings.
Display an application
You can display another application, including another Story Map, on the main stage. Follow the steps for Displaying a Web page, but instead of inserting a Web page URL, copy and paste the URL to the application.
Using story actions to add links to sections
Story actions can also be used to create links from text in the side or floating panel that will jump to a specific section. This can be useful if you want to create a table of contents, or otherwise want to provide the ability to quickly navigate to a specific section.
For details on using actions to create links to sections, see Add links to sections in Story Map Journal.
Summary
Story actions offer lots of creative possibilities and options, but just like seasoning on a great steak, they’re best added in small, focused amounts. Rather than loading a lot of story actions into a single section, think about limiting the main stage actions to just the one or two essential ones necessary to tell your story in each section.
More information
For more information, see the following:
If you are working with the newer ArcGIS StoryMaps, see:
This post was originally published on December 18, 2015, and has been updated.

Commenting is not enabled for this article.