Groups are a feature of ArcGIS organizations that help you organize, share, and secure content items. Using groups effectively requires some understanding of the configuration settings that are available for groups as well as some forethought about the purpose of your groups.
There are many different cases for using groups, so it would be difficult to provide examples of every situation, but this post will present some useful patterns and guidelines. If you are not familiar with groups and their configuration settings review the help topics related to groups in the ArcGIS Online documentation before reading on.
A sense of purpose
First and foremost, it is useful to think about the purpose of your group. Most groups fit into one of these two use cases:
- Broadcast Group – for sharing finished content with an identified audience (everyone, your organization, or a specific collection of individuals)
- Working Group – for sharing in-progress work with a specific group of collaborators (your work colleagues)
If you don’t decide the purpose of your group at the outset – and invite only the appropriate users – the group can quickly lose its usefulness. This is especially important for broadcast groups, which can otherwise be cluttered with half-finished, lower-quality, or off-topic content. This typically happens if people are mistakenly invited into the group as members who are also allowed to contribute to the group.
In many cases you will need more than one group to meet your needs; in fact, working groups and broadcast groups often work well in pairs. For example, a team may use a working group as part of their production/design process to collaborate on creating maps and apps, and that same team may have a broadcast group to share their finished products with the entire organization. Once you identify the types of groups that you need, you can create the groups, set up group content categories, and use the configuration settings to create the experience you need.
The main difference between the settings of the two groups described above is the working group would be private and the broadcast group would be an organizational or public group. Both groups would have the same members.
Broadcast groups
It’s important to realize that item sharing settings control which items users can or cannot view. For example, let’s consider the case where you need to create a collection of items that all users in your organization can see. You might be tempted to create an organizational group and then invite every member of your organization to that group (including members that join your organization after you create the group).
However, in this case you simply need to create an organizational group and then share items to it AND the organization. All users in the organization can see items shared to an organizational group as long as the items themselves are also shared with the organization. A simple way to think about this is that item sharing trumps group settings. In the example above, there is no need to invite users who will not be contributing content to a Broadcast group; the only users in this type of groups should be the contributor(s).
Restricting who can contribute
In some cases, users may request membership in a group so that it appears on their My Groups page. For a group to be listed on a user’s My Groups page the user must be a member of the group. In this case you’ll want to restrict who can share to the group by configuring it to only allow contributions from only the group owner and managers before inviting additional users.
Other ways to provide easier access to a group (without adding additional members) include adding the group as an item to the featured content ribbon on the organization’s homepage or to the organization’s gallery and/or having your administrator add the group to the Featured Groups list. Any of these methods will help people find the group quickly without having to search for it. (To create an item for a group, simply register the group URL as a web application.) You can also share a public group by posting it on a social networking site, emailing a link, embedding it in a website or creating a group-based web application.
Types of items to share
Consider the audience when deciding what types of content to share to a group. If your broadcast group is meant for a general audience or a manager, consider including only apps, as apps are the best way to package finished content for non-GIS professionals. (You must also make sure the web maps or layers referenced by the apps are accessible to the audience already for them to successfully open the apps without any no permission error). If you are sharing to other GIS professionals, it may be appropriate to include web maps and layers so they can find and use these as building blocks for their own maps and apps.
One final thing to know about broadcast groups: any public item can be shared to any group you own. This is useful when you find good content published by Esri or others that you want to broadcast to your own audience.
Working groups
Working groups that are private can only gain members through invitation only since no one is able to find the group. Working groups that are organization/public groups can invite members or accept membership requests. If your group accepts invitations, be sure to visit the group’s Overview or Members tab (not your Groups page) periodically to accept those invitations!
It is important to clearly distinguish between working and broadcast groups for project participants since they may be members of both. Even though group permissions support using a single group for in-progress items (shared to group only) and finished items (shared to group AND org), it is difficult for the project team to keep this straight since they can see both sets of items. Additionally, the content owner may see several versions of the same items in their My Content list and have trouble differentiating between them (folders can help here too).
A good way to organize this is to use two groups and a naming convention for your working groups and in-progress items. For example:
- Broadcast group: “My Mapping Project”
- Working group: “My Mapping Project (working)”
- Final web map: “My web map” [shared only to broadcast group]
- In-progress web map: “My web map (draft)” [shared only to working group]
In this convention a parenthetical descriptor is not used on broadcast groups or finished items so as to not clutter their names since they are the most widely used.
Final Thoughts
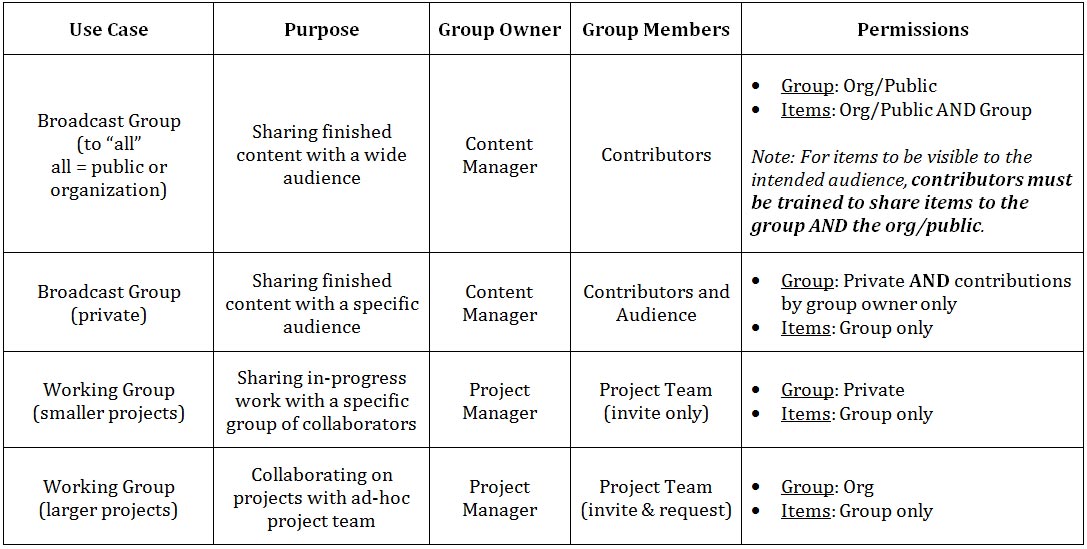
Utilizing the power of groups and sharing will help you get the most out of ArcGIS Online, so we hope these tips and best practices on using groups are helpful. The chart below outlines some common types of groups discussed above and the associated group/item sharing settings.
This post was originally published in November 2013 and was updated in December 2018.
Cover image photo by John Schnobrich on Unsplash.


Commenting is not enabled for this article.