By Mamata Akella, Esri Design Cartographer
In our “Making Beautiful Maps — with GIS!” technical workshop at the 2010 Esri International Users Conference I demoed how to create a custom legend patch shape. This is helpful because you sometimes want the symbols in your legend to look like one or more of the features on your map. This tip was a big hit with our audience so I decided to share this with you as well! And because one of our attendees asked, “How can I customize the legend patch shape for multiple features in my legend?”, I’ll explain that as well.
Below are step-by-step instructions on how to: first, define new legend patch shapes using the New Legend Patch Shape tool, and then how to assign those customized shapes to your legend items.
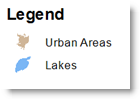
Typically, when you insert a default legend with the default rectangular legend patches, you get something that looks like this:
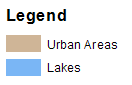
Figure 1. A legend with default legend patch shapes
This blog will show you how to go from a default legend shown in figure 1 to the customized legend seen in figure 2 below.
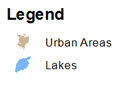
Figure 2. A legend with customized legend patch shapes
There are several pre-defined patch shapes available for you to use in your legends as seen in figure 3.
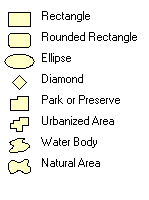
Figure 3. Pre-defined legend patch shapes
If you want to add even more shapes to the list shown in figure 3, you’ll need to use the New Legend Patch Shape tool. To add the New Legend Patch Shape tool to your ArcMap session, first click on Customize on the top bar menu, then click on Customize Mode… In the Customize window, under the Commands tab, type “New Legend Patch Shape” into the “Show Commands Containing” search dialog (figure 4). Once the tool appears in the Commands window, click and hold on the icon and drag it into any of the toolbars in your ArcMap session. Then, click Close to exit the Customize window.
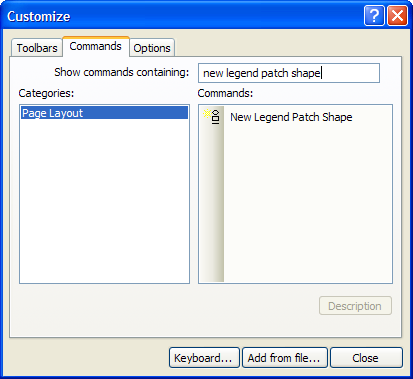
Figure 4. Accessing the New Legend Patch Shape from the Customize menu
Click on the newly added tool to open the New Legend Patch dialog (figure 5). Let’s take a look at what the tool requires so that we can use it later to create our new legend patch shapes.
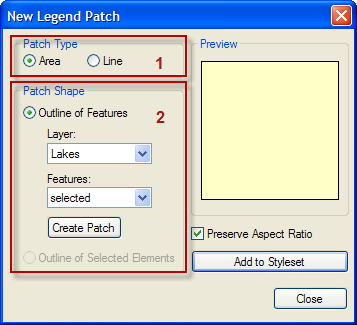
Figure 5. The New Legend Patch tool dialog
Patch Type (highlighted section 1): this is where you define whether the new patch shape you want to create is an Area or a Line.
Patch Shape (highlighted section 2): next, you define which layer you want the patch shape to be taken from and whether you want to create the legend patches from all features, selected features, or visible features.
Now that we know what the input requirements are, we can create the new legend patch shapes.
Defining new legend patch shapes
First, find a feature in your dataset that you feel is a good symbol to use in your legend (this can be done in either Data View or Layout View). Once you have found the feature, use the Select Features tool to select the feature (figure 6).
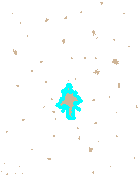
Figure 6. Select a feature to use for the patch shape
Next, open the New Legend Patch tool and select the appropriate Patch Type and Patch Shape parameters (figure 7) – for our example, they are Patch Type = Area and Patch Shape = Outline of selected features in the Urban Areas layer. Then, click Create Patch. Once you click Create Patch, you will see the feature that you selected in the Preview window (figure 7).
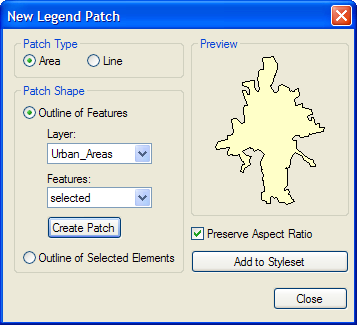
Figure 7. Defining a legend patch shape
Finally, click Add to Styleset to give the new patch shape a name and to save this patch shape to your styleset. Once you are done, click Close.
Note: if you have multiple feature classes that you want to define Legend Patch shapes for, you will have to define patch shapes for each of those features as well.
Assigning the customized legend patch shapes to your legend
In Layout View, insert your Legend (on the top bar menu, click Insert then click Legend). Once you have inserted the legend, right click on it and click Properties (figure 8).
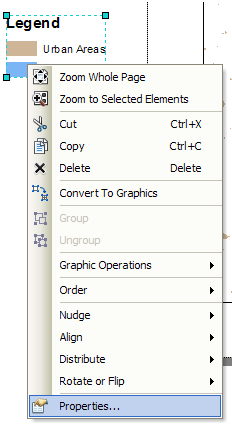
Figure 8. Accessing the properties of a legend
On the Items tab of the Legend Properties dialog (figure 9), under Legend Items, right click on the name of the item you want to change the default patch shape for. Then, click Properties.
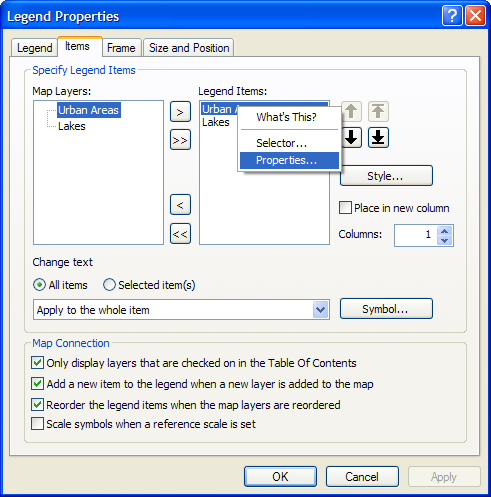
Figure 9. The Legend Properties dialog
In the Legend Item Properties window (figure 10), check the option to “Override default patch” and from either the Line or Area drop down (depending on the feature), and choose your custom legend patch shape. Then, click OK.
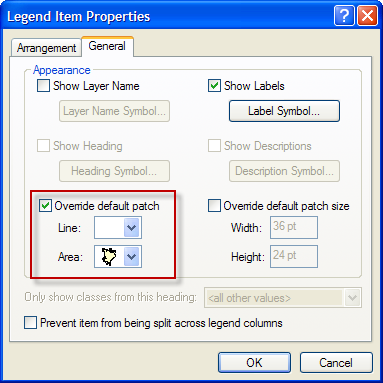
Figure 10. The Legend Item Properties dialog
If you want to change the patch shape for other legend items, right click on the name of each legend item you want to change and repeat the steps above.
Adding a custom legend patch is a great way to make the items in your legend reflect more realistically the features on your map! After all, it is rarely the case that the features in your map are rectangular boxes. Rather, features like urban areas and water bodies are irregularly shaped and now they can be portrayed as such in your legends.


Commenting is not enabled for this article.