When you open the Editor toolbar in ArcGIS 10, you’ll notice that the toolbar looks different. For starters, there is no task list and no target layer list. So how do you add a feature without them? In ArcGIS 10, you use the new Create Features window, which contains all the elements you need. The workflow to create features is the same whether you are editing geodatabases or shapefiles or using an ArcView, ArcEditor, or ArcInfo license.
Introducing feature templates and the Create Features window
When you start editing, the Create Features window opens vertically and docks on the right side of your ArcMap application. The top of the Create Features window lists the feature templates in your map. A feature template is a new concept at ArcGIS 10. It is somewhat like setting the old target layer but is more powerful than that because it contains properties about how new features should be created: the target layer (feature class) where a feature will be stored, the attributes that a feature is created with, and the default tool that is used to create that feature. Feature templates also have a name, description, and tags that can help you find and organize them. You can review and set these on the Template Properties dialog box, which you can open by double-clicking a feature template on the Create Features window.
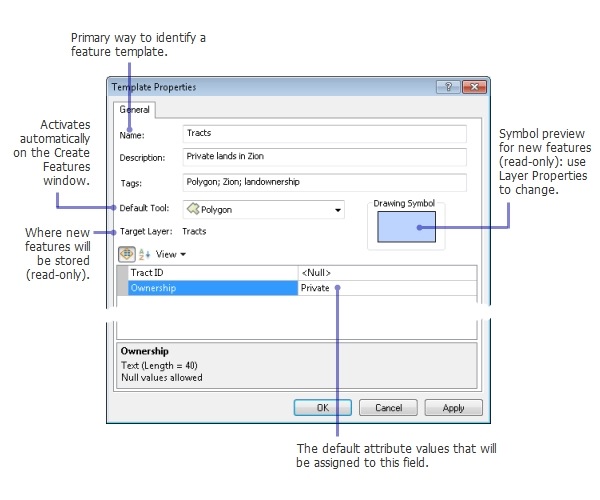
ArcMap automatically creates feature templates for the layers in the current editing workspace the first time you start an edit session in a map. Feature templates are based on the symbology of the layer, so you can have more than one feature template per layer. One feature template is created for a layer symbolized with the single symbol renderer, but a layer drawn with unique values gets a feature template for each symbol category. For example, if you have a layer of roads, a new feature template is created for each symbol type: freeway, major road, local road, and so on. The feature templates have the same target layer property but different road type attributes. This way, if you create a new feature using the freeway feature template, the attribute for the road type is automatically assigned as freeway. The new feature will also be symbolized correctly as a freeway.
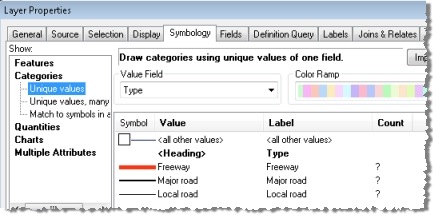
The graphics below show the Layer Properties > Symbology tab listing the unique values symbols used for a Roads layer and the resulting feature templates in the Create Features window. Since the Roads layer has three unique values categories, three feature templates are created, where each one has a different default attribute value for the road type (Freeway, Major road, or Local road).

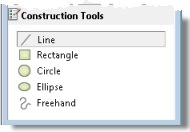
The bottom panel of the Create Features window lists the tools available to create features for the kind of feature template you have selected at the top of the window. For example, if you click the Springs point feature template at the top of the window, the construction tools will change to tools used to create points. If the Freeway line feature template is active, only construction tools that create lines are listed, as shown below.
Creating features with feature templates
So, simply put, to create a feature, choose a feature template at the top of the window and a tool at the bottom of the window. Each feature template has a default construction tool that is automatically activated when you choose a feature template, but you can click a different construction tool in the list to use instead. If you want to create a point representing the location of a spring water feature, simply click the Springs feature template and the Point tool, then click the map where you want to add the point.
To digitize segments as you did with the Sketch tool in previous releases, click a line or polygon feature template, then use the Line or Polygon tool to click the map where you want to place vertices. Straight segments are created by default as you click, but you can change the segment types using the palette on the Editor toolbar or Feature Construction mini toolbar. The Feature Construction toolbar follows the pointer as you click to give you easy access to commonly used tools. If the toolbar gets in your way while digitizing, press the TAB key to reposition it.

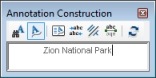
The process for creating annotation and dimensions is the same as for other feature types, so the Annotation and Dimensioning toolbars are not found in ArcGIS 10 since the tools have been integrated with the Create Features window. To create annotation, choose an annotation feature template on the Create Features window and a construction tool, such as Horizontal or Straight. When you click the feature template, the Annotation Construction window appears so you can enter the text of the new annotation, control how the text is placed, and set any additional symbol properties.
Feature templates and editing commands
Feature templates are also used when you are creating features with editing commands, such as Copy Parallel, Buffer, and Union on the Editor menu. In these cases, you set the feature template on the dialog box that opens when you click the command; you do not use the Create Features window. Choosing the feature template on the command’s dialog box specifies the target layer and the default attributes for the new features that will be created. To change the feature template, click the Template button to open the Select Feature Template window and click one of the available feature templates. Editing commands that can only output one type of geometry, such as Copy Parallel for lines, list templates just for that layer type. Commands that can output a variety of layer types list any existing templates that are the proper types.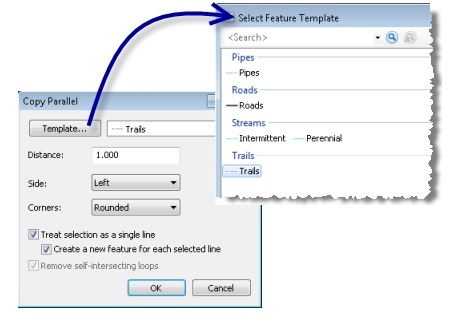
When copying and pasting features, a dialog box appears immediately after you click the Paste button, allowing you to set the target layer. When you paste, you can choose an actual layer, rather than a feature template, so you can retain the attribute values from the copied feature instead of using default attributes. If you are just editing an existing feature, you do not need to specify a feature template.
To learn more about editing in ArcGIS 10, see these help topics:
What’s new for editing in ArcGIS 10
Content provided by Rhonda

Commenting is not enabled for this article.