 With the 10.3 release of Collector for ArcGIS, you can explore new frontiers with your smartphones and tablets and boldly take field data collection where no one in your organization has taken it before. Yeah that’s pretty geeky but that’s what makes us all GIS heroes, right?
So let’s geek out in this blog article and discuss how you can unlock amazing new opportunities to use Collector on smartphones and tablets by taking advantage of just one new enhancement – added support for related tables.
What’s the big deal about “Related Tables” anyway?
Establishing and maintaining positive relationships are important in life and geodatabase design. We won’t ponder life itself, but let’s spend some time discussing database relationships!
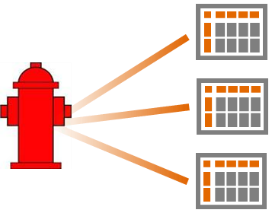 Example: within the lifecycle of a fire hydrant, routine maintenance activities are recorded over time. These maintenance logs or inspections are managed separate of the hydrant itself but are related to it. When viewing an aging infrastructure or planning for changes, you need access to the entire maintenance history. Each inspection is related to the hydrant. Until now these inspections were done using paper and pen – now you can use Collector on a smartphone or tablet device and synchronize directly to your enterprise geodatabase!
Within your geodatabase, you can create a relationship between hydrants and inspections using relationship classes. A relationship class will enforce the referential integrity between hydrants and inspections. All relationships have a cardinality that describe the nature of the relationship and in this example, the cardinality would be 1: many (one hydrant can have many inspection records).
You can use Collector to inspect hydrants and when you create a new inspection record it establishes a relationship between the inspection and the hydrant being inspected. We recommend that you create relationships using the GlobalID field on your layer so that primary key of the relationship (your parent hydrant feature) is guaranteed to be unique when establishing a connection to a new inspection record.
Collector supports relationship classes between features, between tables and between features and tables! Here is another real-world example of a feature to feature relationship with different cardinality – a leak detection report involves recording several readings along a pipeline. Each reading has its own location and several readings may be related to a single pipe. This is an example of a many: one relationship between reading features and pipeline features. We will talk about this one later!
Relationships can be nested together as well. For example, you may want to record one or more violations during your inspection of a hydrant. To do this you can create an additional 1: many relationship between inspections and violations. Collector supports these nested relationships but only 3 relationship classes deep (hydrant > inspections > violations). Of course you can have as many relationships as you want (hydrant > inspections, hydrant > manufacturer, hydrant > valve). Each table or child layer in the relationship can also have attachments if you like as well. Our example above has them.
Finally, Collector can enforce cardinality within relationships as well. It supports 1:1, 1: many and many: 1. It does not support many: many relationships though.
Creating and Publishing Maps with Relationships
Spoiler Alert: What we do next is only supported with ArcGIS Online at this time. If you are using Portal for ArcGIS, you will need to wait for the 10.3.1 release in order to create a map that Collector can use to edit related tables!
Using the example above of hydrants and inspections, let’s walk through the experience of publishing the feature service and configuring the web map to support our new frontier! You can download the Hydrant Inspection Map Package and follow along…
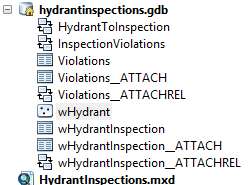 Download the HydrantInspection.mpk from the link above and open in inside of ArcMap. There you can discover the feature layers and relationships that will bring hydrant inspections to life on your smartphone!
Note that the wHydrant layer is a point feature class that contains a relationship to a wHydrantInspection table. You can discover the nature of the relationship by double-clicking on HydrantToInspection. You will see that the relationship is 1: many.
 You may also note that the wHydrantInspection layer has attachments as well. Know that both feature layers and tables support attachments and from the nesting of relationships perspective – attachments are fully supported. Now in the contents panel of the map document, you can click on the Database tab and note that inside of the map are both the feature layer and the tables.
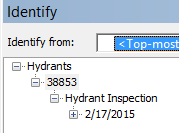 If you click on the Identify tool and then tap on a hydrant you can discover the relationship between hydrants and inspection records.
Within ArcMap you can sign in to your organization and publish Hydrant Inspections as a web layer within your My Content. To sign in you can either use the Sign In… command under the File menu in ArcMap or you can double click on My Hosted Services in the Catalog window. Once signed in, you can then Share the map as a Service within your organization. Note that your related tables must be in the map when you publish the service! More details about publishing, offline support and related tables can be found in the ArcGIS Server documentation about feature services.
Within the Service Editor, click on Capabilities, enable feature access, disable Tiled Mapping and make sure to check on all of the editing operations before clicking the Publish button. This will create a new service item inside of your organization that will include the Hydrants layer along with the Inspections table and the Violations table as well.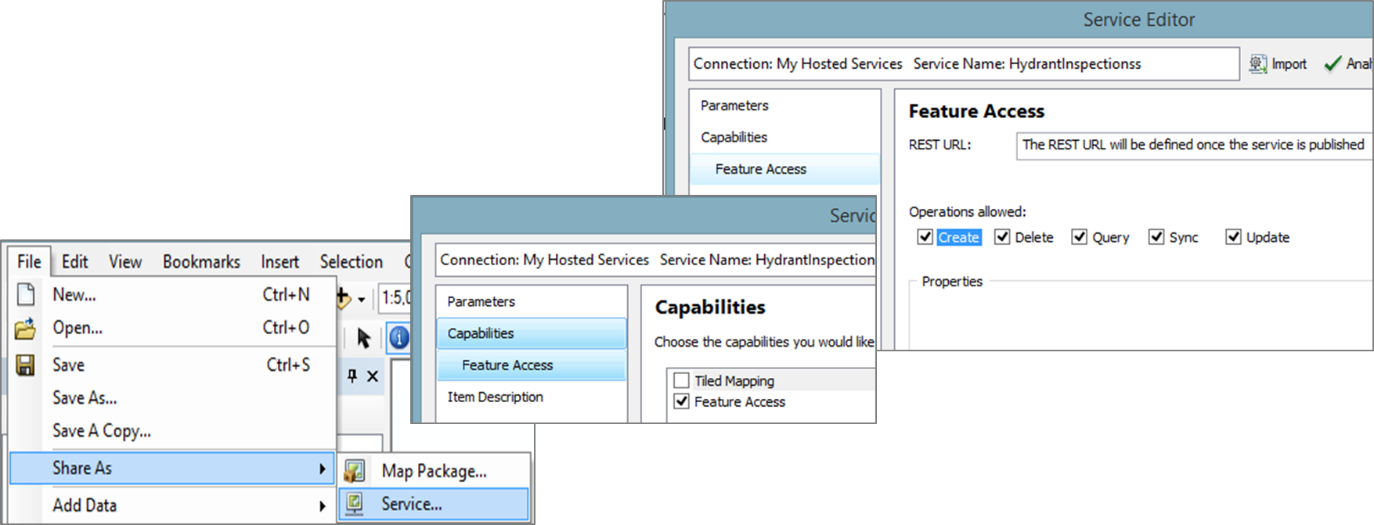
TIP: Editing permissions are controlled at the feature service and if you want to edit related records you need the service to be editable. However within the map itself you can disable editing on the hydrants feature layer and then only the related tables will be editable.
Authoring Web Maps with Related Tables
Next, you will want to create a web map from the service that you just created. To do that, open your web browser, sign into your organization and find the service you just created inside of your My Content. Here you will want to add it to a new map. Within the map you should rename the layers to something meaningful. For example, call the hydrants layer “Hydrants” and rename the Inspections table to “Hydrant Inspections” and the violations table to “Violations”. The names of the feature layer and of the tables will ripple through to the experience within the form when using Collector.
Make sure that popups are enabled for your layers and related tables! If they are not enabled, the related tables will not appear in the form.

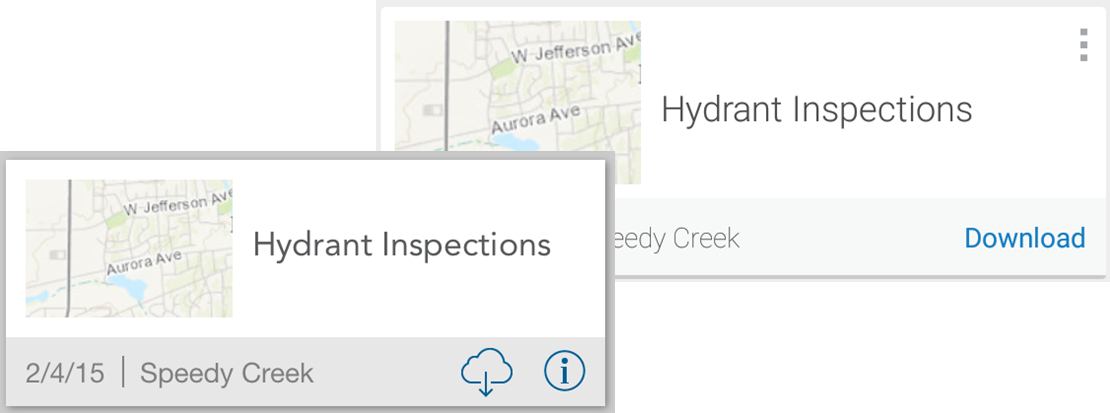
TIP: When you configure the popups for your related tables, take advantage of the Title. The title appears on the inspection form so make it meaningful. For example, set the title to be the value of the Inspection Date and/or Inspector field. You can adjust is the sort order for related data as well – this is a cool new feature! In the screenshot below, the sort order for the Hydrants layer is set to show Hydrant Inspections with the most recent inspection at the top of the list and you can see that the Title displays the Inspected date. So if you want to control how previous inspections appear and how they look, you can change the sort order from the parent within the relationship (in this case the parent is the Hydrants feature layer itself) and modify the title.

Take advantage of the ability to re-order/rename and change the visibility of fields as well. It’s important that you prioritize and display what is most meaningful to your related tables just like you do with a feature layer that you create.
Finally you can save the web map, call it Hydrant Inspections, and share it with the groups that your field workforce are members of.
Creating and Maintaining Relationships inside of Collector
Once you have created your hydrant inspection map, you are ready to send your field workforce where no one has gone before.
After installing Collector 10.3 on your smartphone or tablet, you can sign in to your ArcGIS organization and from the list of maps you should see Hydrant Inspections as a new map that you can open and/or download to your device.
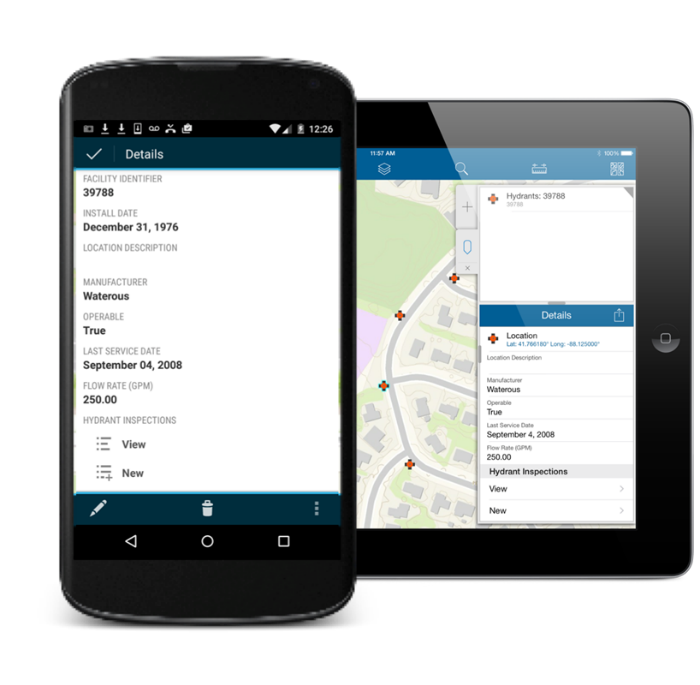
Opening the map you will find that the app will try to center the display on your current location- it is a field app after all! Unless you are physically located in Naperville, Illinois, you won’t find any hydrants to inspect! A couple of options here for you – either you could create a hydrant to inspect or you could tap on the bookmarks tool and return to the default map extent in Naperville. Then you can zoom in to find a hydrant to inspect! Regardless of the path you choose, tap on a hydrant and view the form details. If you are on a phone, you will need to tap Show Details but if you are on a tablet you will see the form details straight away.
On the form you will see something exciting! Down at the bottom you will find a section titled “Hydrant Inspection”. There you can view existing related records or create new ones.
Creating new related records in Collector
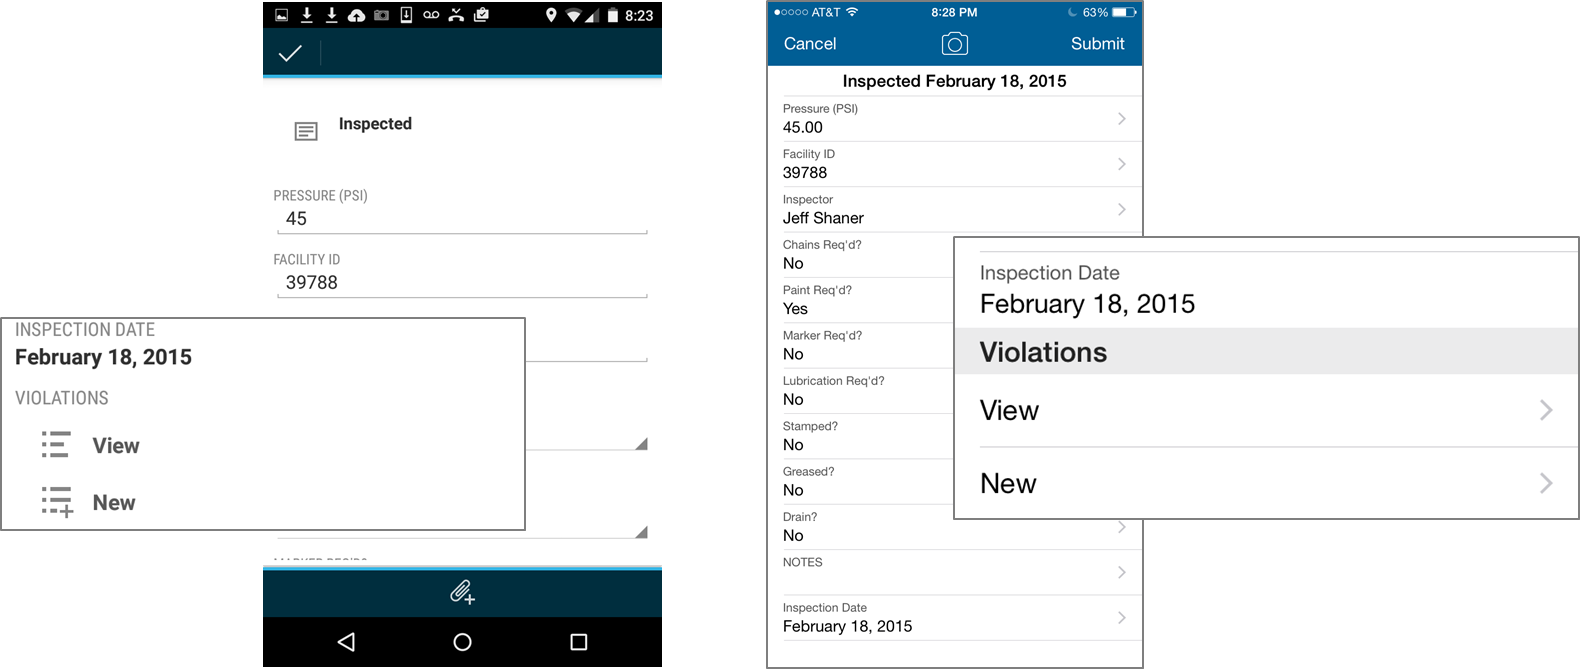
A related record is modeled as a sub-form of the parent feature. You start by selecting a parent feature (a hydrant) and showing the form details of that feature. From the details you can create a new related record (an inspection). This flows through nested relationships as well (from the details of a hydrant inspection you can create a new related violation record).
By presenting related records as a “sub-form” you have a consistent, predictable flow to navigating hierarchical relationships within Collector that just feels natural. Simple right? The screenshot below shows the related table form for both Android and iOS, along with a magnified view of how Violations would appear within the sub-form of an inspection. Try it out for yourself!
Ok so how would this work if the related record is a feature rather than just a dumb row in a table? Well let’s take a look at the other example briefly mentioned above (the leak detection survey where you have a pipe feature that has multiple readings associated with it).
Here you would start by selecting the pipe feature on the map, showing the details of the pipe form where you can create a new related leak report. Tapping New will bring forward the list of feature types for that related layer and you can choose the type that makes most sense. The rest of the flow is exactly the same as creating a new feature! You can tap on the map button and place the location of the reading (or use the GPS) and fill out the related record form. Below is how this flow looks on an Android phone.
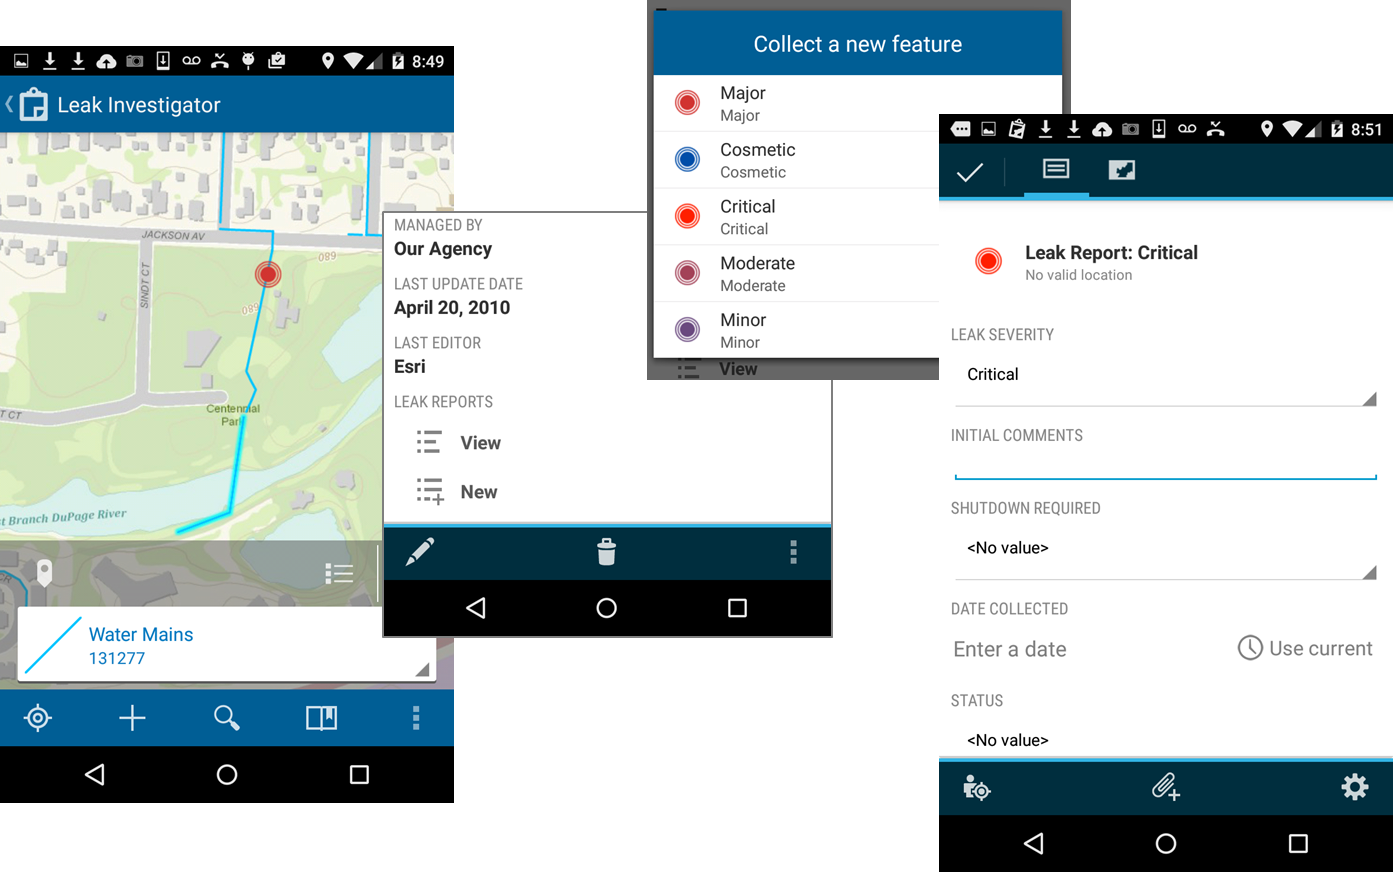
Something to consider with feature to feature relationships is what happens when you tap the Collect button? Well we need to enforce the integrity of relationships as defined in the service! The relationship in this example shows that pipelines are the parent and leak reports are the child. So when you tap the Collect button you will only see pipeline (parent types) and not leak report types to collect from. Instead, you need to select a pipe to create a new leak report. This enforces the integrity of the relationship as we can pass the primary key from the parent pipe feature to the foreign key of the child leak report feature.
Lots of detail in this article for your reference! Here are some important points to remember:
- Collector support for related table editing is only supported with ArcGIS Online right now. The next update of Portal for ArcGIS (10.3.1) will include support for creating a web map that supports editing of a related table. No update to Collector will be required to support Portal.
- Make sure to include all related tables in your map document before you publish as a feature service.
- Where possible use GlobalID fields to model relationships and enforce referential integrity.
- When authoring your web map, make sure to enable pop-ups on the related tables and spend the time to rename layers and configure the title, sort options and fields.
- Be a GIS hero in your organization and reap the benefits of configuring and deploying Collector!
The 10.3 release of Collector for ArcGIS is available NOW on the Android platform and as of March 9th is now available on the Apple platform as well. Please provide your feedback on Collector. Let us know about your successes and your needs as well by emailing our dev team at Collector4ArcGIS.

Article Discussion: