Have you ever wanted to put your vacation photographs on a map and share them with friends and family? You can use ArcGIS Online to display the pictures on a web map so others can interact with the places you visited. Creating a simple, interactive photo map with ArcGIS Online requires three steps: creating editable layers, configuring pop-up messages, and sharing the map with others.
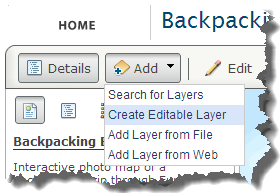
Before you begin, you will need to sign up for a free, personal ArcGIS Online account. After you have an account, sign-in to ArcGIS Onlineand click the Map button to start building the map of your trip. In the map viewer, click the Add button and click Create Editable Layer.
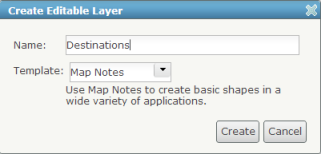
Because this layer will demonstrate the points you visited, type an appropriate name, such as Destinations. You can use the default template Map Notes. Click Create when you are done.
 In the Add Features pane to the left of the map, choose a point symbol and click the map to add points. After you have placed a point, a dialog box appears allowing you to set a title for the destination point and, if desired, type additional information for the description.
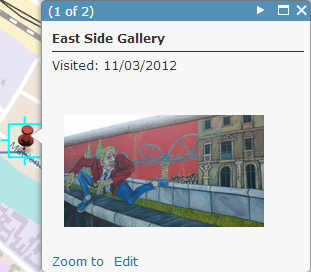
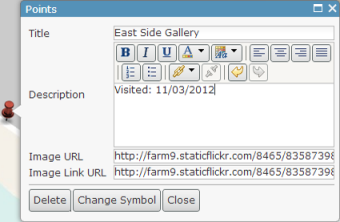 To ensure the pop-up message correctly displays the photo, you will need the full URL where the photo is hosted, such as http://farm9.staticflickr.com/8465/8358739845_d0e36ca2b0_b.jpg. Enter this URL for both the Image URL and Image Link URL properties of the dialog box. Doing this shows a thumbnail in the pop-up message and opens the full-size image when it’s clicked upon. After filling in the point’s information, click Close.
Navigate to each additional location on the map, create a point, and repeat these steps at your remaining destinations. Once you have finished adding points to the editable layer, click the Save button to save the web map to ArcGIS Online. Enter a title, tags to help others find the map, a summary, specify the folder in your account in which to save the map, and click Save Map.
If you want to illustrate the route you took on your trip, you can use a line to connect each destination point corresponding to the order you visited it. To do this, repeat the steps to add another editable layer, give it an appropriate title, and use the Map Notes template. Now, click the Line symbol on the Add Features pane. To ensure that the line is accurate from point to point, you can use snapping as you create the line. Zoom in to the point, hold down the Ctrl key to snap to the first point, and click to create the line’s start point. A crosshair appears to indicate snapping is enabled.
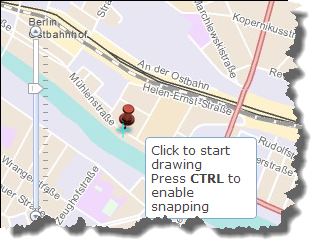 Now, navigate to the remaining points, and hold down Ctrl and click to create a vertex at each destination. Note that you can drag to pan to the next point. When you have connected all the points, double-click to finish creating the line. Fill in the description, make any desired symbol changes, and click Close. To save your map users time from zooming in to each destination, you can create bookmarks that re-position the map at a specific location and scale. To do this, zoom in to a destination and click the Bookmarks button, Add Bookmark, and provide a name. After you have finished creating bookmarks, save the map to store your edits.
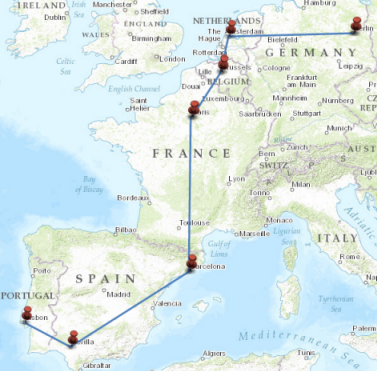 Now, click the Share button and make sure to share the map with Everyone (public). You can now copy the URL and send it to your family and friends! You can visit my map: Backpacking Europe.
For those interested in interactive photo maps, take a look at the Storytelling Map Tour Template.

Commenting is not enabled for this article.