One of the projects I am currently working on is updating the World Topographic Basemap. My map document contains several hundred layers (361 to be precise) distributed among twelve scale-dependent group layers. In order to add this to the online topo map, I will need to cache it, which will take approximately eight days. So I need to be confident I am not overlooking any minor details that will result in me having to re-cache; such as having the labels turned off for a particular label class in order to speed up labeling time when I’m adjusting the labels for another layer, or missing the “m” for “meters” at the end of the summit point elevations (the author is guilty on both accounts).
Before I start caching, I X-Ray my map document for a quick and easy quality control. X-Ray is a tool used to develop, refine and document your geodatabase designs. To learn more about the X-Ray tool, read the X-Ray for ArcGIS 10 Updated entry on the Esri Local Government Blog. X-Ray documents many of the properties of your .mxd and its layers in a single, easy to understand .html file. Whether you’re making a complex map with many scale-dependent group layers or a simple map with only of two or three layers, comprehensive and straightforward documentation can alleviate much confusion (by having concise documentation for every single layer in your .mxd in one document), save time (not wasting eight days on a cache that had a few minor overlooked errors), and even simplify your maps (if you see a layer in your map many times, you may be able to adjust the definition queries and replicate the layer fewer times).
This blog entry explains the benefits and the ease of X-Raying your .mxds. With the newest version of the X-Ray for ArcGIS 10 Map Documents ArcMap add-in, it is now very easy for you to create this documentation for all of your map documents.
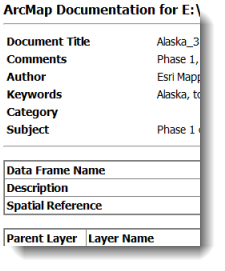
You can see a few of the “X-Rayed” fields below in the screenshot of the Topographic Map Template – Medium Scales X-Ray. The X-Ray document includes the content from the Map Document Properties dialog. For each layer in the .mxd, it contains the parent layer (this is the name of the group layer if one is used), the layer name, its description and its credits, whether representations are set for the layer, and the maximum/minimum scale ranges.
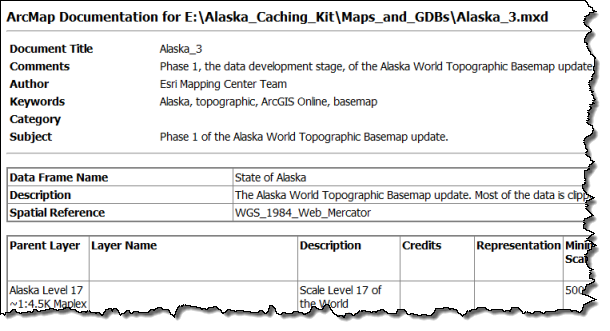
Additional fields (not shown in the screenshot) include: whether the layer is visible, the source (i.e., the feature class name in the geodatabase), layer symbology type (categories – unique values, quantities – graduated symbols, etc…), any definition queries or labeling SQL queries, and minimum/maximum scale ranges for annotation.
Now that you know more about WHAT the X-Ray tool does, let’s see HOW you use it. First, download X-Ray for ArcGIS 10 Map Documentsand save the add-in on your computer in a folder that you’ll remember – you will need to navigate to this file location later in the installation process. Open your ArcMap document, click Customize on the top bar menu, and click Add-In Manager. If you have downloaded a previous version of X-Ray, you should first delete the existing version using the Add-In Manager.
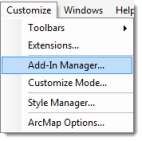
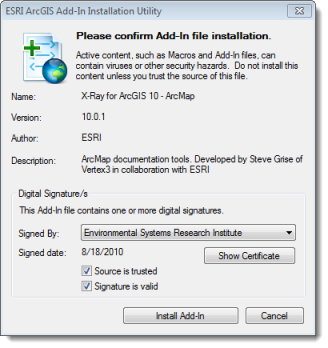
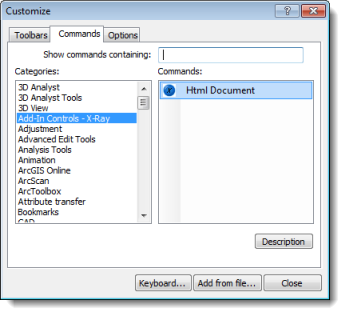
From Add-In Manager, click Customize. Click Add from File and navigate to where you saved the XRayArcMap.esriAddIn file, and click Open. In the dialog box that asks you to confirm the file installation, keep all the defaults and click Install Add-In.
Once the installation is complete, another dialog box will open notifying you the Add-In was installed.
The final step is to add the tool to any toolbar in your ArcMap interface. To do this, click Customize from the top bar menu, then click Customize Mode. On the Commands tab, in the Categories panel, click Add-In Controls – X-Ray in the Categories, then click and hold to drag the Html Document command to any toolbar in your ArcMap interface.
Now you’re ready to X-Ray your map document. Simply click on the X-Ray button you just added to a toolbar. The X-Ray is taken, the resulting .html document pops up in your default Internet browser, and it is automatically saved to the same folder with your X-Rayed map document. If you would like to print your results, this is best accomplished by printing on 11″ x17″ tabloid paper in the landscape orientation.
Congratulations, you’ve just X-Rayed your map document!

Commenting is not enabled for this article.