Snapping allows you to create features that connect to each other so your edits are more accurate, with fewer errors. In ArcGIS 10, you can choose from one of two snapping environments to use when you are editing. The default is the new Snapping toolbar, which is flexible, easy-to-use, and has more snapping types, more options, and better feedback. Alternatively, you can enable classic snapping, which provides fine-grained control over the snapping environment. This post provides an overview of each environment, so you can decide which one allows you to get your editing done most effectively.
Snapping toolbar (the default snapping environment)
The Snapping toolbar is the central location where you manage the snapping settings. There is minimal setup required, since the most common snapping types are enabled by default. The Snapping toolbar environment is used by the editing tools, but is also available outside of an edit session and is used by other parts of ArcGIS, such as georeferencing and the Measure tool. Snapping is also part of ArcGIS Engine, so you can build custom applications that utilize snapping.
Snapping is managed at the map level, so whenever a snap type is turned on, you can snap to any visible feature layer. This also includes layer types that are not editable, such as basemap layers or CAD files. You cannot snap to features that are hidden from the map, though, including when the layer is turned off, has a definition query (visible features in the layer can still be snapped to), and is beyond the layer scale range. Snapping is useful when creating new features or when editing existing ones, such as by reshaping edges, splitting lines or polygons, moving features, or editing features in a topology.
The Snapping toolbar has buttons to enable snapping to points, edges, vertices, and ends, which are all on by default. The order in which snapping occurs to certain types is determined automatically; the highest priority is given to snapping to sketch elements. To turn on or off individual snap types, click them on the toolbar. If you want to stop snapping temporarily, hold down the space-bar. To turn off snapping altogether, uncheck Use Snapping on the Snapping menu.
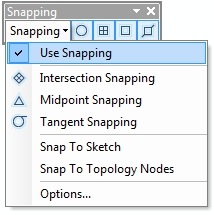
To set options for working with the ArcGIS 10 snapping environment, click the Snapping menu and click Options. From there, you can set the snapping tolerance in pixels, which is the distance your pointer needs to be from a feature for snapping to occur, or customize the snapping feedback. As you move your mouse pointer, you get visual cues in the form of pop-up SnapTips and the pointer icon to tell you the layer you are snapping to and with which snapping type. You can change the color of the icon and the content, font, and color of SnapTips. When you are working over imagery, add a background to the SnapTip to place a solid fill behind the text so it is easier to read. Your snapping settings apply to all your ArcMap sessions since they are saved in the registry for the application.
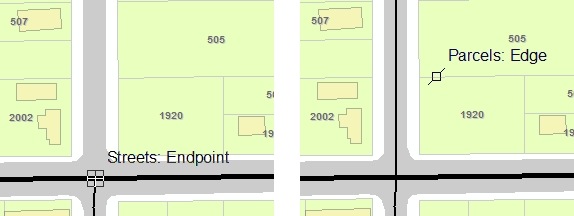
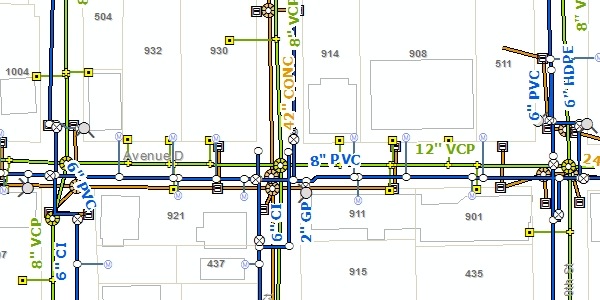
Each snapping type (vertex, edge, endpoint, intersection, and so on) has its own pointer icon, which matches the buttons on the Snapping toolbar. For example, the pointer is a square with lines inside it when you are snapping to an endpoint and becomes a box with diagonal lines when you are snapping to an edge. In the following example graphics showing streets and parcels, you can see the SnapTips with the layer name and the snap type. When creating a new road, snap to the existing endpoint (Streets: Endpoint) so the segment connects to it. If you need to create a building footprint at a parcel boundary, snap to the Parcels: Edge.
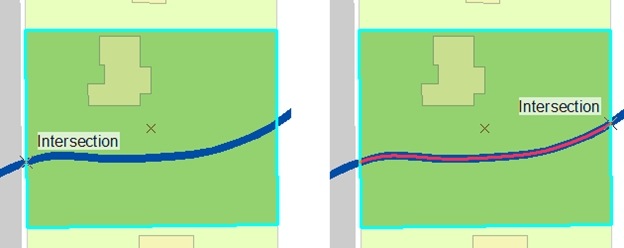
On the Snapping menu, you can enable snapping to an intersection, segment midpoint, or curve tangent point. These additional snap types are only available with the new snapping environment. For example, intersection snapping allows snapping to locations where two features intersect but there may not be any defined vertex or endpoint there. You might use intersection snapping when you are adding points at street intersections or dividing a feature where it meets another feature. If you need to split a park where a stream crosses it, you can turn on intersection snapping, then select the park polygon, click the Cut Polygons tool on the Editor toolbar, snap to the first intersection, and use Trace to follow along the stream’s edge. When you have traced across the park, snap to the other intersection and finish the sketch to cut the park into two features.
Since you can snap to any visible features in a layer, you may need to spend some time authoring your map. If you find you are snapping to layers you don’t want to snap to, make sure you need that layer to be displayed in the first place. By turning off unnecessary layers, disabling certain snap types, setting layer scale ranges, and making sure your labels and symbols are as descriptive as they can be, you can use the Snapping toolbar more effectively.
Classic snapping
Classic snapping is the snapping environment that you may be familiar with from ArcGIS 9. Classic snapping is available to you in cases where you need more control over the way snapping occurs or if you are working with a part of ArcGIS that uses only classic snapping, such as tracing with the ArcScan for ArcGIS extension and editing in ArcScene and ArcGlobe. When classic snapping is enabled on the Editing Options > General tab, editing tools only use the classic snapping environment. However, georeferencing tools, the Measure tool, and other non editing tools continue to use the snap settings on the Snapping toolbar.

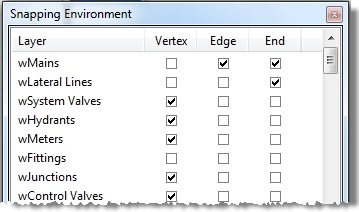
Classic snapping allows you to manage the individual snapping types, layers, and priorities. In classic snapping, snapping settings are specified for each layer and type (vertex, edge, or end) in the Snapping Environment window, which you open by clicking the Editor menu, pointing to Snapping, and clicking Snapping Window. No snapping occurs until you check some boxes in the window. You can drag and drop layers up and down the list to change the snapping order; layers at the top will be snapped to before layers further down the list. To snap to points, check the Vertex box since there is no specific point snap type in classic snapping.
To set options for classic snapping, click the Editor menu, point to Snapping, and click Options. From there, you can change the snapping tolerance in either pixels or map units and turn on SnapTips, which are off by default. SnapTips with classic snapping cannot be customized (they will always show the layer and type) and are opaque yellow, rather than the semitransparent SnapTips available with the Snapping toolbar. The setting for enabling classic snapping is stored in a map document; its options are saved in the ArcGIS registry.
Enabling classic snapping is most useful for complicated maps with lots of overlapping layers. When working with complex utility data, for example, classic snapping may be beneficial because you have many features in one location, but need to snap easily to a particular feature and in a certain order. If you are creating water mains, you could move that layer up in the list so new mains snap to existing mains first and set whether they should snap at vertices, edges, or ends. Since utility data often has many point features, you can reorder the point layers in the list so new lines connect to certain points, such as system valves or hydrants, before they snap to other types of point features. If you do not want to snap to a particular layer at all, uncheck it from the list. However, features not visible because of definition queries can still be snapped to when you are using classic snapping.
This kind of fine management of the snapping environment is only possible with classic snapping. However, this also takes a lot of work to maintain and set up, considering that each layer in the map is listed in the window and has three separate boxes to check. So, if you are trying to snap to a feature but no snapping occurs, you have to sort through a potentially lengthy list of layers and checkboxes to enable the snapping. With the Snapping toolbar, snapping is on for all layers.
Summary
Each snapping environment has trade-offs of ease versus control that you need to evaluate. Some users have reported that they were skeptical of the Snapping toolbar at first and immediately went back to classic snapping because they were familiar with it, but eventually spent time using the Snapping toolbar and loved it. The Snapping toolbar might take some time to get used to, but its simplicity and power should meet the needs of most editing tasks. However, you can switch between the snapping environments at any time on the Editing Options dialog box so you can use the one that is most appropriate for your current work.
Data credits:
Data used in the examples is from the Water Network Utilities Template by Esri and Fort Pierce, Florida.
For more information:
About snapping
About the editing classic snapping environment
Content provided by Rhonda (Editing Team)
Commenting is not enabled for this article.