For many GIS users and cartographers, the use of external graphics software is a common step in his or her workflow and production of print quality maps. One of ArcMap’s more popular export formats is the Adobe Illustrator (AI) export because of its wide compatibility with a number of graphics software packages. This export format was first made available in ArcGIS 8.1 Service Pack 1 and has been popular ever since. The ArcMap AI exporter has been fully tested to work in Adobe Illustrator CS and CS2. It is currently being tested in CS3 with good initial results.
Since the majority of print production workflows rely on using four process colors (cyan, magenta, yellow and black – CMYK), it is important to set them up correctly. Setting the proper color values in ArcMap will help minimize the amount of time needed to adjust color values in AI or any other graphics software. There are several basic tips in ArcMap that will help you set the correct color values for export:
- The colors of symbols must be set to CMYK in order to preserve those values in the exported AI file. In ArcMap’s user interface, there is no way to know whether a color is a CMYK color. Follow these steps to change it:
- Right-click on a color in the table of contents, or in the Symbol Selector window, click on the color chip to open the quick select color palette and choose More Colors.
- In the Color Selector window, click the black triangle button and choose CMYK Sliders. (Note: even if the CMYK sliders show up by default, this does not indicate the color model; the sliders that show will be the last sliders you used; they do not indicate the color model.)
- Adjust the layer color to your liking by using the sliders or enter the individual CMYK values. IMPORTANT: You must change something, even if you just switch a value and then switch it back in order to convert the color to CMYK. If you only switch the model, the internal property of the color will not get set to CMYK and the CMYK values you saw may not be preserved (rounding errors and the like are often observed).
- Press OK and Apply to finish.
- To export your map:
- From the File menu, choose Export Map
- In the Options area, click on the Format tab
- Set the Destination Colorspace to CMYK. If you have set the CMYK values for your colors, those values will now be preserved in the output AI file.
- ArcMap’s default colors (the ones initially shown in the quick select color palette) are stored in esri.style and are defined as RGB colors. When you add data and get randomly assigned colors, those colors are in the HSV (Hue, Saturation, Value) color model. These HSV colors can be converted to CMYK colors by using Steps 1.1 – 1.4 above. However, the same workflow will not change those colors to any other color model, so for instance, you cannot convert an HSV color to RGB. The HSV values will be converted to RGB and stored when you click OK. To guarantee a change in color model, choose Advanced Selection from the Color Selector’s menu on the black triangle button; then choose the model, set the values, and click OK in both dialogs.
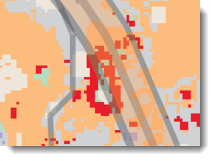
- A vector layer that you have tagged with CMYK values will not preserve its CMYK values in the output AI file if a transparency is applied to it. This occurs because vector layers with a transparency are rendered as rasters in ArcMap (hence only RGB values are preserved). A workaround for this is to export your vector layer with no transparency (0%) and then adjust the transparency in AI or other graphics software. This will also improve image quality as there are no vector lines that were pixilated during the export. (Below the image on the top shows what can happen if ArcMap transparency is used, while the image on the bottom is the result of setting the transparency in the graphics software rather than ArcMap.)
Hopefully these tips will help you when exporting your ArcMap documents for further work in graphics software.

Commenting is not enabled for this article.